Before You Begin
- Complete the steps in Prepare Your VPC and EC2 Instances.
- Launch the EC2 instances that you plan to register with your load balancer. Ensure that the security groups for these instances allow HTTP access on port 80.
- Install a web server, such as Apache or Internet Information Services (IIS), on each instance, enter its DNS name into the address field of an Internet-connected web browser, and verify that the browser displays the default page of the server.
Step 1: Select a Load Balancer Type
Elastic Load Balancing supports three types of load balancers: Application Load Balancers, Network Load Balancers, and Classic Load Balancers. For this tutorial, you create a Classic Load Balancer. Alternatively, to create an Application Load Balancer, see Getting Started with Application Load Balancers in the User Guide for Application Load Balancers. To create a Network Load Balancer, see Getting Started with Network Load Balancers in the User Guide for Network Load Balancers.
To create a Classic Load Balancer
- Open the Amazon EC2 console at https://console.aws.amazon.com/ec2/.
- On the navigation bar, choose a region for your load balancer. Be sure to select the same region that you selected for your EC2 instances.
- On the navigation pane, under LOAD BALANCING, choose Load Balancers.
- Choose Create Load Balancer.
- For Classic Load Balancer, choose Create.
Step 2: Define Your Load Balancer
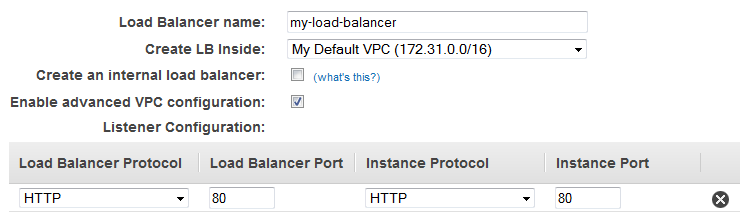
You must provide a basic configuration for your load balancer, such as a name, a network, and a listener.
A listener is a process that checks for connection requests. It is configured with a protocol and a port for front-end (client to load balancer) connections and a protocol and a port for back-end (load balancer to instance) connections. In this tutorial, you configure a listener that accepts HTTP requests on port 80 and sends them to your instances on port 80 using HTTP.
To define your load balancer and listener
- For Load Balancer name, type a name for your load balancer.The name of your Classic Load Balancer must be unique within your set of Classic Load Balancers for the region, can have a maximum of 32 characters, can contain only alphanumeric characters and hyphens, and must not begin or end with a hyphen.
- For Create LB inside, select the same network that you selected for your instances: EC2-Classic or a specific VPC.
- [Default VPC] If you selected a default VPC and would like to choose the subnets for your load balancer, select Enable advanced VPC configuration.
- Leave the default listener configuration.
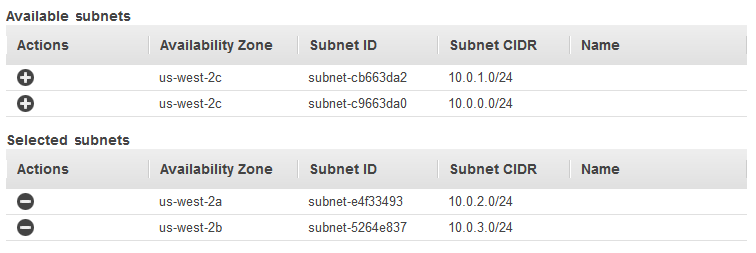
- [EC2-VPC] For Available subnets, select at least one available public subnet using its add icon. The subnet is moved under Selected subnets. To improve the availability of your load balancer, select more than one public subnet.NoteIf you selected EC2-Classic as your network, or you have a default VPC but did not select Enable advanced VPC configuration, you do not see the user interface to select subnets.You can add at most one subnet per Availability Zone. If you select a subnet from an Availability Zone where there is already an selected subnet, this subnet replaces the currently selected subnet for the Availability Zone.
- Choose Next: Assign Security Groups.
Step 3: Assign Security Groups to Your Load Balancer in a VPC
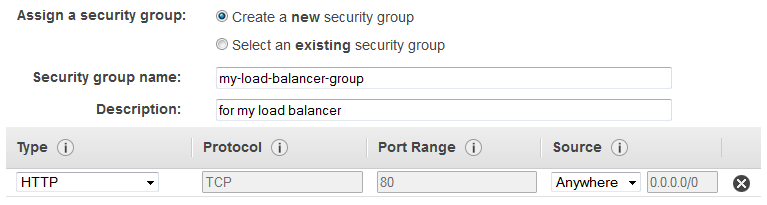
If you selected a VPC as your network, you must assign your load balancer a security group that allows inbound traffic to the ports that you specified for your load balancer and the health checks for your load balancer.
Note
If you selected EC2-Classic as your network, you can continue to the next step. By default, Elastic Load Balancing provides a security group for load balancers in EC2-Classic.
To assign security group to your load balancer
- On the Assign Security Groups page, select Create a new security group.
- Type a name and description for your security group, or leave the default name and description. This new security group contains a rule that allows traffic to the port that you configured your load balancer to use.
- Choose Next: Configure Security Settings.
- For this tutorial, you are not using a secure listener. Choose Next: Configure Health Check to continue to the next step.
Step 4: Configure Health Checks for Your EC2 Instances
Elastic Load Balancing automatically checks the health of the EC2 instances for your load balancer. If Elastic Load Balancing finds an unhealthy instance, it stops sending traffic to the instance and reroutes traffic to healthy instances. In this step, you customize the health checks for your load balancer.
To configure health checks for your instances
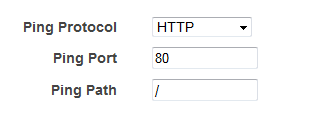
- On the Configure Health Check page, leave Ping Protocol set to HTTP and Ping Port set to 80.
- For Ping Path, replace the default value with a single forward slash ("/"). This tells Elastic Load Balancing to send health check queries to the default home page for your web server, such as
index.html. - For Advanced Details, leave the default values.
- Choose Next: Add EC2 Instances.
Step 5: Register EC2 Instances with Your Load Balancer
Your load balancer distributes traffic between the instances that are registered to it.
Note
When you register an instance with an elastic network interface (ENI) attached, the load balancer routes traffic to the primary IP address of the primary interface (eth0) of the instance.
To register EC2 instances with your load balancer
- On the Add EC2 Instances page, select the instances to register with your load balancer.
- Leave cross-zone load balancing and connection draining enabled.
- Choose Next: Add Tags.
Alternatively, you can register instances with your load balancer later on using the following options:
- Select running instances after you create the load balancer. For more information, see Register Instances with Your Load Balancer.
- Set up Auto Scaling to register the instances automatically when it launches them. For more information, see Set Up a Scaled and Load-Balanced Application in the Amazon EC2 Auto Scaling User Guide.
Step 6: Tag Your Load Balancer (Optional)
You can tag your load balancer, or continue to the next step. Note that you can tag your load balancer later on; for more information, see Tag Your Classic Load Balancer.
To add tags to your load balancer
- On the Add Tags page, specify a key and a value for the tag.
- To add another tag, choose Create Tag and specify a key and a value for the tag.
- After you are finished adding tags, choose Review and Create.
Step 7: Create and Verify Your Load Balancer
Before you create the load balancer, review the settings that you selected. After creating the load balancer, you can verify that it's sending traffic to your EC2 instances.
To create and test your load balancer
- On the Review page, choose Create.
- After you are notified that your load balancer was created, choose Close.
- Select your new load balancer.
- On the Description tab, check the Status row. If it indicates that some of your instances are not in service, its probably because they are still in the registration process. For more information, see Troubleshoot a Classic Load Balancer: Instance Registration.
- After at least one of your EC2 instances is in service, you can test your load balancer. Copy the string from DNS name (for example, my-load-balancer-1234567890.us-west-2.elb.amazonaws.com) and paste it into the address field of an Internet-connected web browser. If your load balancer is working, you see the default page of your server.
Step 8: Delete Your Load Balancer (Optional)
As soon as your load balancer becomes available, you are billed for each hour or partial hour that you keep it running. When you no longer need a load balancer, you can delete it. As soon as the load balancer is deleted, you stop incurring charges for it. Note that deleting a load balancer does not affect the instances registered with the load balancer.
To delete your load balancer
- If you have a CNAME record for your domain that points to your load balancer, point it to a new location and wait for the DNS change to take effect before deleting your load balancer.
- Open the Amazon EC2 console at https://console.aws.amazon.com/ec2/.
- On the navigation pane, under LOAD BALANCING, choose Load Balancers.
- Select the load balancer.
- Choose Actions, Delete.
- When prompted for confirmation, choose Yes, Delete.
- (Optional) After you delete a load balancer, the EC2 instances associated with the load balancer continue to run, and you are billed for each hour or partial hour that you keep them running.


No comments:
Post a Comment