Sunday, July 28, 2019

Authentication And Authorization In ASP.NET Core 2.0 Using Azure Active Directory And OpenID Connect

Integrating Azure AD in ASP.NET Core is very simple using Visual Studio wizard. This article will cover the identity management with Azure AD and related configuration in ASP.NET Core web applications. We will check out what's going on behind the scenes to integrate the Azure AD into ASP.NET Core web application for authentication and authorization.
Article Flow -

Setup Azure Active Directory tenant

  • Creating new Azure AD tenant
  • Adding new users in the Azure AD tenant
  • Adding new groups in the Azure AD tenant
  • Registering new application
Integrating Azure AD into ASP.NET Core 2.0 Web Application
  • Choosing template
  • Changes in the app settings
  • Added extension files for Azure AD authentication
  • Added NuGet packages
  • Setting up Azure AD authentication in startup
  • Applying the authorize attribute on controllers or actions
Role Base Authorization in ASP.NET Core 2.0 with OpenID Connect and Azure AD Groups
  • Updating the application manifest file with the Azure AD tenant
  • Getting the group object ID from Azure AD and updating appsettings file
  • Setting up Azure AD authorization in startup
  • Applying policy on the controllers or actions
  • Testing claims for role-based authorization
Prerequisites 
Let's drill down the basics.
  • Authentication
    It verifies the identity (verifies, who you are).
  • Authorization
    It is a security mechanism which is used to define the access permission to do something (verifies, what you can access).
  • OpenID
    It is an authentication mechanism which allows existing account (i.e., Google, Facebook account) to sign in to the websites where you don't need to create specific username and password for each website.
  • OpenID Connect
    It is used for the authentication on the top of the OAuth (provides authorization).
  • Azure Active Directory
    It is an identity management service in the cloud for the applications.
  • Azure Active Directory tenant
    It is a dedicated instance of an organization within the Azure Directory. It contains the users, groups, register applications and other information and its security. If you don't have the Azure Active Directory tenant then you need to create one before registering and configuring your applications. Finally, it will allow the users to sign-in and authenticate with Azure AD.
Setup Azure Active Directory tenant
Creating New Azure AD Tenant 
Open the Azure Portal account and click on "+ Create a resource" icon in the left pane and filter for the Azure Active Directory. Click on the Create button at the bottom of the page.


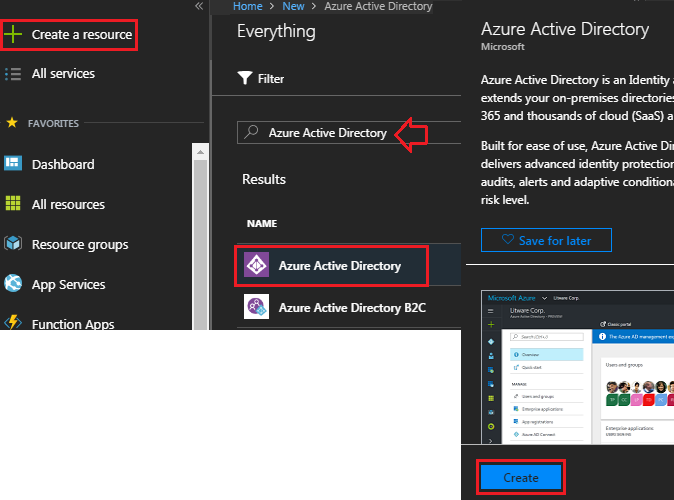
In the "Create directory" page, enter the organization name and Initial domain name. The Initial domain name (say, softdreams; full name: softdreams.onmicrosoft.com) is the Azure Active Directory tenant name. For country or region, choose the country. Finally, click on the "Create" button.


Adding New Users in the Azure AD tenant
You need a user before registering your application. To add a user, select the Azure Active Directory>Users>All users>+ New user.
 

In the user page, fill-up the Name, username and directory role, then create a temporary password for the password field. This temporary password will be needed when first time you log in and then, you will need to change it. Finally, click on the Create button.

Adding New Groups in the Azure AD tenant
If you need a role based authentication for your applications then create groups and add users into these groups. To create group, select the Azure Active Directory>Groups>All groups>+ New group. Fill-up the Group type, Group name, Group description and Membership type. Finally click on the Create button at the bottom of the page.


To add members into the group, select the Azure Active Directory>Groups>All groups. Now find and select the group then select members>+Add members.


NoteYou can synchronize existing users and groups to the Azure AD tenant from on-premises windows Server AD by installing and configuring Azure AD Connect on the server.

Registering New Application
In the example of the .net core project, I didn’t manually register the application. If you want to register a new application manually then select Azure Active Directory>App registration>+ New application registration. Now fill-up the required filed and click on the Create button on the button of the create page.

Integrating Azure AD into ASP.NET Core 2.0 Web Application
In Azure AD, we can manually register our applications; but Visual Studio 2017 supports a simple wizard to register a new application and add Azure AD authentication.

Choosing Template
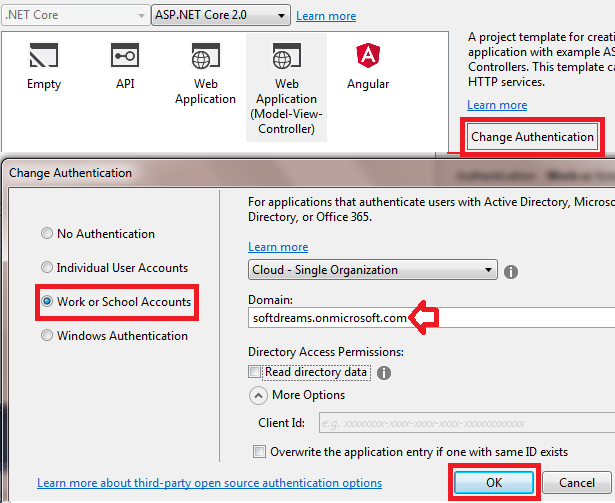
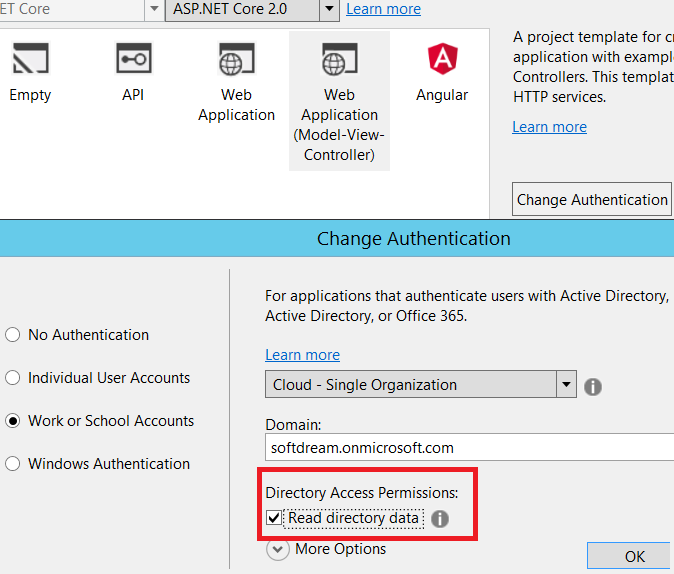
Open Visual Studio to create a new project. Select ASP.NET Core Web Application>Choose Web Application (Model-View-Controller) template> Click on the "Change Authentication" button>Select "Work or School Accounts".

Choose Cloud - Single Organization. Fill up the field of Domain which is the Azure Active Directory tenant name (say, softdreams.onmicrosoft.com).


Leave blank the Client Id. If you manually register the application in the Azure AD tenant then you will get application ID which is the client Id here. Click on the OK button to create the project. It is now ready to validate the OpenID Connect authentication.
Checking out what's going on behind the scenes, few changes we need to know step by step that happened in the project. 
 
Changes in the Appsettings
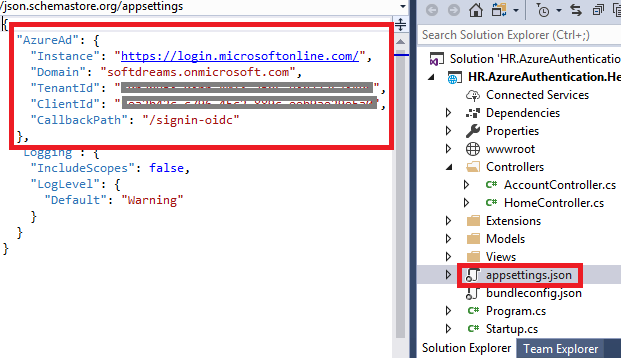
  • Domain
    This is the Azure Active Directory tenant name (say, softdreams.onmicrosoft.com).
  • TenantId
    This is the Azure Active Directory ID. To verify the Directory ID, select Azure Active Directory>Properties>Directory ID.
  • ClientId
    This is the application ID of the web app which is registered automatically by the visual studio wizard. To verify the application ID, select Azure Active Directory>App registrations>find and select your app (say, "HR.AzureAuthentication.HelloWorld")>Application ID
 
  • Callback Path
    This is the redirect path after authentication (say, https://localhost:44387/signin-oidc).
If you open this project and select Solution Explorer>Project properties>Debug, then you will find the SSL enable URL which is https://localhost:44387/.

Now if you want to add the production callback redirect path (say, https://helloworld.softdreams.com/signin-oidc) then select Azure Active Directory>App registrations>find and select your app (say, HR.AzureAuthentication.HelloWorld)>Settings>Reply URLs, then add the production redirect path and save it.


Added Extension Files for Azure AD Authentication
The AzureAdAuthenticationBuilderExtensions and AzureAdOptions files are created in the extensions folder.

Added NuGet Packages
  • Microsoft.AspNetCore.Authentication.Cookies and
  • Microsoft.AspNetCore.Authentication.OpenIdConnect are added for authentication.
Setting up Azure AD Authentication in Startup
In the startup file, the below codes are added.


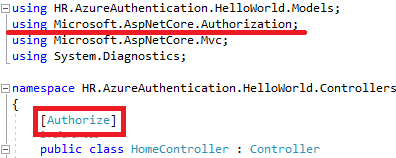
Applying Authorize Attribute on the Controllers or Actions
In the HomeController file, [Authorize] attribute is added.

 
Role Base Authorization in ASP.NET Core 2.0 with OpenID Connect and Azure AD Groups 
Did you remember the options of the bellow image? In this image, we need to check the "Read directory data" if we want to read the AD information of the users like profile, role, groups etc. from the Azure AD.


Updating the Application Manifest File with the Azure AD tenant
If you want to read the groups of the user, you need to modify the manifest of the app in Azure AD. To update the manifest file select, Azure Active Directory>App registrations>find and select your app (say, HR.AzureAuthentication.HelloWorld)>Click on the manifest from the top action bar and Change "groupMembershipClaims": null to “groupMembershipClaims": "SecurityGroup".

If you choose “SecurityGroup” then you will get all of the group lists of the users. If you choose “All” then you will get the security groups and distribution lists. Anyway, finally click on the save button.


Getting the Object ID of the Group from Azure AD and Update Appsettings File
If you want to implement role based authorization then you need the object Id of that group from Azure AD for adding it in the appsettings file. If you add all of the configurations values into the appsettings file then it is easy to modify the values. To get the Object ID of the group, Select, Azure Active Directory>Groups>search your required group>Properties.


Now copy the Object ID from the General Setting page and past it into the appsettings.json file of your project.


Setting up Azure AD Authorization in Startup
You need to add the below codes into ConfigureServices method of the Startup file. In this project, say, we have two types of roles (admin and user). That's why we are adding Admins and Users groups.

 
  1. services.AddAuthorization(options => {  
  2.     options.AddPolicy("Admins", policyBuilder => policyBuilder.RequireClaim("groups", Configuration.GetValue < string > ("AzureSecurityGroup:AdminObjectId")));  
  3. });  
  4. services.AddAuthorization(options => {  
  5.     options.AddPolicy("Users", policyBuilder => policyBuilder.RequireClaim("groups", Configuration.GetValue < string > ("AzureSecurityGroup:UserObjectId")));  
  6. });  
Applying Policy on the Controllers or Actions
Add the [Authorize(Policy = "Users")] or [Authorize(Policy = "Admins")] attributes on the top of the controllers or actions according to your requirements.


Testing Claims for Role-based Authorization
You can check the group list which are coming from the Azure AD after successful login. Use the below codes to do that.
  1. var groups = User.Claims.Where(c => c.Type == "groups").ToList();  
Note
Before running the attached project select the appsettings.json file and change the "Domain", "TenantId, "ClientId" "AdminObjectId", "UserObjectId": according to your values of the Azure AD tenant, register application, and groups.

    How to Calling a web API in an ASP.NET Core web application using Azure AD

    Step 1: Clone or download this repository

    From your shell or command line:
    git clone https://github.com/Azure-Samples/active-directory-dotnet-webapp-webapi-openidconnect-aspnetcore.git
    

    Step 2: Register the sample application with your Azure Active Directory tenant

    There are two projects in this sample. Each needs to be separately registered in your Azure AD tenant. To register these projects, you can:
    If you want to use this automation:
    1. On Windows, run PowerShell and navigate to the root of the cloned directory
    2. In PowerShell run:
       Set-ExecutionPolicy -ExecutionPolicy RemoteSigned -Scope Process -Force
    
    1. Run the script to create your Azure AD application and configure the code of the sample application accordingly.
    2. In PowerShell run:
       .\AppCreationScripts\Configure.ps1
    
    Other ways of running the scripts are described in App Creation Scripts
    1. Open the Visual Studio solution and click start to run the code.
    If you don't want to use this automation, follow the steps below.

    Choose the Azure AD tenant where you want to create your applications

    As a first step you'll need to:
    1. Sign in to the Azure portal using either a work or school account or a personal Microsoft account.
    2. If your account is present in more than one Azure AD tenant, select your profile at the top right corner in the menu on top of the page, and then switch directory. Change your portal session to the desired Azure AD tenant.

    Register the service app (TodoListService-aspnetcore)

    1. Navigate to the Microsoft identity platform for developers App registrations page.
    2. Select New registration.
    3. When the Register an application page appears, enter your application's registration information:
      • In the Name section, enter a meaningful application name that will be displayed to users of the app, for example TodoListService-aspnetcore.
      • Change Supported account types to Accounts in any organizational directory.
      • In the Redirect URI (optional) section, select Web in the combo-box and enter the following redirect URIs: https://localhost:44351/.
    4. Select Register to create the application.
    5. On the app Overview page, find the Application (client) ID value and record it for later. You'll need it to configure the Visual Studio configuration file for this project.
    6. Select the API permissions section
      • Click the Add a permission button and then,
      • Ensure that the Microsoft APIs tab is selected
      • In the Commonly used Microsoft APIs section, click on Microsoft Graph
      • In the Delegated permissions section, ensure that the right permissions are checked: User.Read. Use the search box if necessary.
      • Select the Add permissions button
    7. Select the Expose an API section, and:
      • Select Add a scope
      • Accept the proposed Application ID URI (api://{clientId}) by selecting Save and Continue
      • Enter the following parameters
        • for Scope name use user_impersonation
        • Keep Admins and users for Who can consent
        • in Admin consent display name type Access TodoListService-aspnetcore as a user
        • in Admin consent description type Accesses the TodoListService-aspnetcore Web API as a user
        • in User consent display name type Access TodoListService-aspnetcore as a user
        • in User consent description type Accesses the TodoListService-aspnetcore Web API as a user
        • Keep State as Enabled
        • Select Add scope

    Register the client app (TodoListWebApp-aspnetcore)

    1. Navigate to the Microsoft identity platform for developers App registrations page.
    2. Select New registration.
    3. When the Register an application page appears, enter your application's registration information:
      • In the Name section, enter a meaningful application name that will be displayed to users of the app, for example TodoListWebApp-aspnetcore.
      • Change Supported account types to Accounts in any organizational directory. > Note that there are more than one redirect URIs. You'll need to add them from the Authentication tab later after the app has been created successfully.
    4. Select Register to create the application.
    5. On the app Overview page, find the Application (client) ID value and record it for later. You'll need it to configure the Visual Studio configuration file for this project.
    6. From the app's Overview page, select the Authentication section.
      • In the Redirect URIs section, select Web in the combo-box and enter the following redirect URIs.
        • https://localhost:44377/
        • https://localhost:44377/signin-oidc
      • In the Advanced settings section set Logout URL to https://localhost:44371/Account/EndSession
      • In the Advanced settings | Implicit grant section, check ID tokens and Access Tokens as this sample requires the Implicit grant flow to be enabled to sign-in the user, and call an API.
    7. Select Save.
    8. From the Certificates & secrets page, in the Client secrets section, choose New client secret:
      • Type a key description (of instance app secret),
      • Select a key duration of either In 1 yearIn 2 years, or Never Expires.
      • When you press the Add button, the key value will be displayed, copy, and save the value in a safe location.
      • You'll need this key later to configure the project in Visual Studio. This key value will not be displayed again, nor retrievable by any other means, so record it as soon as it is visible from the Azure portal.
    9. Select the API permissions section
      • Click the Add a permission button and then:
      • Ensure that the My APIs tab is selected
      • In the list of APIs, select the API TodoListService-aspnetcore.
      • In the Delegated permissions section, ensure that the right permissions are checked: user_impersonation.
      • Select the Add permissions button.

    Configure authorized client applications for service (TodoListService-aspnetcore)

    For the middle tier web API (TodoListService-aspnetcore) to be able to call the downstream web APIs, the user must grant the middle tier permission to do so in the form of consent. However, since the middle tier has no interactive UI of its own, you need to explicitly bind the client app registration in Azure AD, with the registration for the web API. This binding merges the consent required by both the client and middle tier into a single dialog, which will be presented to the user by the client. You can do so by adding the "Client ID" of the client app, to the manifest of the web API in the knownClientApplications property. Here's how:
    1. In the Azure portal, navigate to your TodoListService-aspnetcore app registration, and in the Expose an API section, click on Add a client application. Input the client ID of the client application (TodoListWebApp-aspnetcore) and check user_impersonation for authorized scopes.
    2. Click Add application

    Step 3: Configure the sample to use your Azure AD tenant

    In the steps below, "ClientID" is the same as "Application ID" or "AppId".
    Open the solution in Visual Studio to configure the projects

    Configure the service project

    Note: if you used the setup scripts, the changes below will have been applied for you
    1. Open the TodoListService\appsettings.json file
    2. Find the app key Domain and replace the existing value with your Azure AD tenant name.
    3. Find the app key TenantId and replace the existing value with your Azure AD tenant ID.
    4. Find the app key ClientId and replace the existing value with the application ID (clientId) of the TodoListService-aspnetcore application copied from the Azure portal.

    Configure the client project

    Note: if you used the setup scripts, the changes below will have been applied for you
    1. Open the TodoListWebApp\appsettings.json file
    2. Find the app key Domain and replace the existing value with your Azure AD tenant name.
    3. Find the app key TenantId and replace the existing value with your Azure AD tenant ID.
    4. Find the app key ClientId and replace the existing value with the application ID (clientId) of the TodoListWebApp-aspnetcore application copied from the Azure portal.
    5. Find the app key ClientSecret and replace the existing value with the key you saved during the creation of the TodoListWebApp-aspnetcore app, in the Azure portal.
    6. Find the app key TodoListResourceId and replace the existing value with api://{TodoListService_ClientId}.

    Step 4: Run the sample

    In the solution properties, set both projects as startup projects. Set TodoListService to run first. Clean the solution, rebuild it, and then run it.
    On startup, the web API displays an empty web page. This is expected behavior.
    Explore the sample by signing in into the web app, clicking on "Todo List", signing again if needed, adding items to the To Do list, signing-out, and starting again. Since the authenticated session is stored in a cookie, the application doesn't require logging in again if the previous session was never signed out.
    [!NOTE] The To Do list is stored in memory in this sample. Each time the TodoListService API is stopped, any to-do lists are reset.

    How was the code created?

    Code for the service

    The code for the service is exactly the same as the service used in the active-directory-dotnet-native-aspnetcore sample. Please refer to that sample for more information.

    Code for ASP.NET Web App

    The code for the ASP.NET web app is based on the code of the active-directory-dotnet-webapp-openidconnect-aspnetcore sample. Please read the "About The code" section of that sample first.
    Then, based on that code, the following modifications were applied. This commit details the incremental changes described below: - Update of the AzureAdOptions class to add a property to compute the Authority from the instance and the tenantID, and adding two other configuration options for ClientSecret, the resourceId of TodoListService (its clientId) and the base address for this service. - Added a TodoListItem in models to deserialize the Json sent by the TodoListService - Added a NaiveSessionCache class in a new Utils folder which serves as a token cache which livetime is the duration of the session. Updated the Startup.cs file accordingly to add sessions. - Added a TodoListController and a Todo view, as well as a "Todo List" entry in the toolbar of the Web API. This is where most of the interesting code is - Updated the SignOut() method of the AccountController to clear the cache for the user when s/he signs-out. - Updated AzureAdAuthenticationBuilderExtensions.cs to request an authorization code, and redeem it, getting an access token to the Azure AD graph (https://graph.windows.com), so that the token cache contains a token for the user. This token will be used by the TodoController to request another token for the TodoListService
    This scenario is slightly different than the same scenario in ASP.NET (not Core). Note the following line in AzureAdAuthenticationBuilderExtensions.cs:
    options.ResponseType = "id_token code";
    
    Unlike ASP.NET, ASP.NET Core 2.0 uses an implicit flow by default. Without overriding the response type (default id_token), the OnTokenValidated event is fired instead of OnAuthorizationCodeReceived. The line above requests both id_token and code, so that OnTokenValidated is called first. This ensures that context.Principal has a non-null value representing the signed-in user when OnAuthorizeationCodeReceived is called.

    How to change the app URL

    If you are using Visual Studio 2017 1. Edit the TodoListService's properties (right click on TodoListService.csproj, and choose Properties) 1. In the Debug tab: 1. Check the Launch browser field to https://localhost:44351/api/todolist 1. Change the App URL field to be https://localhost:44351 as this is the URL registered in the Azure AD application representing our Web API. 1. Check the Enable SSL field
    The same kind of modifications can be made on the TodoListWebApp.csproj project.
    [!WARNING] Ensure that all of the app registration steps reflect any changes made to the URLs, or the sample won't function.

    What to change when you deploy the sample to Azure

    To this sample to Azure: - Update the various URLs (reply URLs, Base URL) in the appsettings.json files - Add Reply URLs pointing to the deployed location, for both applications in the Azure portal

    Azure Government Deviations

    In order to run this sample on Azure Government you can follow through the steps above with a few variations:
    • Step 2:
      • You must register this sample for your AAD Tenant in Azure Government by following Step 2 above in the Azure Government portal.
    • Step 3:
      • Before configuring the sample, you must make sure your Visual Studio is connected to Azure Government.
      • Navigate to the appsettings.json files for both the TodoListService web API and TodoListWebApp web application. Replace the "Instance" property in the Azure AD section with https://login.microsoftonline.us/.
    Once those changes have been accounted for, you should be able to run this sample on Azure Government.

    What is Azure Active Directory?

    Azure Active Directory (Azure AD) is Microsoft’s cloud-based identity and access management service, which helps your employee's sign in and access resources in:
    • External resources, such as Microsoft Office 365, the Azure portal, and thousands of other SaaS applications.
    • Internal resources, such as apps on your corporate network and intranet, along with any cloud apps developed by your own organization.

    Who uses Azure AD?

    Azure AD is intended for:
    • IT admins. As an IT admin, you can use Azure AD to control access to your apps and your app resources, based on your business requirements. For example, you can use Azure AD to require multi-factor authentication when accessing important organizational resources. Additionally, you can use Azure AD to automate user provisioning between your existing Windows Server AD and your cloud apps, including Office 365. Finally, Azure AD gives you powerful tools to automatically help protect user identities and credentials and to meet your access governance requirements. To get started, sign up for a free 30-day Azure Active Directory Premium trial.
    • App developers. As an app developer, Azure AD gives you a standards-based approach for adding single sign-on (SSO) to your app, allowing it to work with a user's pre-existing credentials. Azure AD also provides APIs that can help you build personalized app experiences using existing organizational data. To get started, sign up for a free 30-day Azure Active Directory Premium trial
    • Microsoft 365, Office 365, Azure, or Dynamics CRM Online subscribers. As a subscriber, you're already using Azure AD. Each Microsoft 365, Office 365, Azure, and Dynamics CRM Online tenant is automatically an Azure AD tenant. You can immediately start to manage access to your integrated cloud apps.

    What are the Azure AD licenses?

    Microsoft Online business services, such as Office 365 or Microsoft Azure, require Azure AD for sign-in and to help with identity protection. If you subscribe to any Microsoft Online business service, you automatically get Azure AD with access to all the free features.
    To enhance your Azure AD implementation, you can also add paid capabilities by upgrading to Azure Active Directory Basic, Premium P1, or Premium P2 licenses. Azure AD paid licenses are built on top of your existing free directory, providing self-service, enhanced monitoring, security reporting, and secure access for your mobile users.
     Note
    For the pricing options of these licenses, see Azure Active Directory Pricing.
    Azure Active Directory Premium P1, Premium P2, and Azure Active Directory Basic are not currently supported in China. For more information about Azure AD pricing, contact the Azure Active Directory Forum.
    • Azure Active Directory Free. Provides user and group management, on-premises directory synchronization, basic reports, self-service password change for cloud users, and single sign-on across Azure, Office 365, and many popular SaaS apps.
    • Azure Active Directory Basic. In addition to the Free features, Basic also provides cloud-centric app access, group-based access management, self-service password reset for cloud apps, and Azure AD Application Proxy, which lets you publish on-premises web apps using Azure AD.
    • Azure Active Directory Premium P1. In addition to the Free and Basic features, P1 also lets your hybrid users access both on-premises and cloud resources. It also supports advanced administration, such as dynamic groups, self-service group management, Microsoft Identity Manager (an on-premises identity and access management suite) and cloud write-back capabilities, which allow self-service password reset for your on-premises users.
    • Azure Active Directory Premium P2. In addition to the Free, Basic, and P1 features, P2 also offers Azure Active Directory Identity Protection to help provide risk-based Conditional Access to your apps and critical company data and Privileged Identity Management to help discover, restrict, and monitor administrators and their access to resources and to provide just-in-time access when needed.
    • "Pay as you go" feature licenses. You can also get additional feature licenses, such as Azure Active Directory Business-to-Customer (B2C). B2C can help you provide identity and access management solutions for your customer-facing apps. For more information, see Azure Active Directory B2C documentation.
    For more information about associating an Azure subscription to Azure AD, see How to: Associate or add an Azure subscription to Azure Active Directory and for more information about assigning licenses to your users, see How to: Assign or remove Azure Active Directory licenses.

    Terminology

    To better understand Azure AD and its documentation, we recommend reviewing the following terms.
    Term or conceptDescription
    IdentityA thing that can get authenticated. An identity can be a user with a username and password. Identities also include applications or other servers that might require authentication through secret keys or certificates.
    AccountAn identity that has data associated with it. You cannot have an account without an identity.
    Azure AD accountAn identity created through Azure AD or another Microsoft cloud service, such as Office 365. Identities are stored in Azure AD and accessible to your organization's cloud service subscriptions. This account is also sometimes called a Work or school account.
    Azure subscriptionUsed to pay for Azure cloud services. You can have many subscriptions and they're linked to a credit card.
    Azure tenantA dedicated and trusted instance of Azure AD that's automatically created when your organization signs up for a Microsoft cloud service subscription, such as Microsoft Azure, Microsoft Intune, or Office 365. An Azure tenant represents a single organization.
    Single tenantAzure tenants that access other services in a dedicated environment are considered single tenant.
    Multi-tenantAzure tenants that access other services in a shared environment, across multiple organizations, are considered multi-tenant.
    Azure AD directoryEach Azure tenant has a dedicated and trusted Azure AD directory. The Azure AD directory includes the tenant's users, groups, and apps and is used to perform identity and access management functions for tenant resources.
    Custom domainEvery new Azure AD directory comes with an initial domain name, domainname.onmicrosoft.com. In addition to that initial name, you can also add your organization's domain names, which include the names you use to do business and your users use to access your organization's resources, to the list. Adding custom domain names helps you to create user names that are familiar to your users, such as alain@contoso.com.
    Account AdministratorThis classic subscription administrator role is conceptually the billing owner of a subscription. This role has access to the Azure Account Center and enables you to manage all subscriptions in an account. For more information, see Classic subscription administrator roles, Azure Role-based access control (RBAC) roles, and Azure AD administrator roles.
    Service AdministratorThis classic subscription administrator role enables you to manage all Azure resources, including access. This role has the equivalent access of a user who is assigned the Owner role at the subscription scope. For more information, see Classic subscription administrator roles, Azure RBAC roles, and Azure AD administrator roles.
    OwnerThis role helps you manage all Azure resources, including access. This role is built on a newer authorization system called role-base access control (RBAC) that provides fine-grained access management to Azure resources. For more information, see Classic subscription administrator roles, Azure RBAC roles, and Azure AD administrator roles.
    Azure AD Global administratorThis administrator role is automatically assigned to whomever created the Azure AD tenant. Global administrators can do all of the administrative functions for Azure AD and any services that federate to Azure AD, such as Exchange Online, SharePoint Online, and Skype for Business Online. You can have multiple Global administrators, but only Global administrators can assign administrator roles (including assigning other Global administrators) to users.

    Note
    This administrator role is called Global administrator in the Azure portal, but it's called Company administrator in Microsoft Graph API, Azure AD Graph API, and Azure AD PowerShell.

    For more information about the various administrator roles, see Administrator role permissions in Azure Active Directory.
    Microsoft account (also called, MSA)Personal accounts that provide access to your consumer-oriented Microsoft products and cloud services, such as Outlook, OneDrive, Xbox LIVE, or Office 365. Your Microsoft account is created and stored in the Microsoft consumer identity account system that's run by Microsoft.

    Which features work in Azure AD?

    After you choose your Azure AD license, you'll get access to some or all of the following features for your organization:
    CategoryDescription
    Application managementManage your cloud and on-premises apps using Application Proxy, single sign-on, the My Apps portal (also known as the Access panel), and Software as a Service (SaaS) apps. For more information, see How to provide secure remote access to on-premises applications and Application Management documentation.
    AuthenticationManage Azure Active Directory self-service password reset, Multi-Factor Authentication, custom banned password list, and smart lockout. For more information, see Azure AD Authentication documentation.
    Business-to-Business (B2B)Manage your guest users and external partners, while maintaining control over your own corporate data. For more information, see Azure Active Directory B2B documentation.
    Business-to-Customer (B2C)Customize and control how users sign up, sign in, and manage their profiles when using your apps. For more information, see Azure Active Directory B2C documentation.
    Conditional AccessManage access to your cloud apps. For more information, see Azure AD Conditional Access documentation.
    Azure Active Directory for developersBuild apps that sign in all Microsoft identities, get tokens to call Microsoft Graph, other Microsoft APIs, or custom APIs. For more information, see Microsoft identity platform (Azure Active Directory for developers).
    Device ManagementManage how your cloud or on-premises devices access your corporate data. For more information, see Azure AD Device Management documentation.
    Domain servicesJoin Azure virtual machines to a domain without using domain controllers. For more information, see Azure AD Domain Services documentation.
    Enterprise usersManage license assignment, access to apps, and set up delegates using groups and administrator roles. For more information, see Azure Active Directory user management documentation.
    Hybrid identityUse Azure Active Directory Connect and Connect Health to provide a single user identity for authentication and authorization to all resources, regardless of location (cloud or on-premises). For more information, see Hybrid identity documentation.
    Identity governanceManage your organization's identity through employee, business partner, vendor, service, and app access controls. You can also perform access reviews. For more information, see Azure AD identity governance documentation and Azure AD access reviews.
    Identity protectionDetect potential vulnerabilities affecting your organization's identities, configure policies to respond to suspicious actions, and then take appropriate action to resolve them. For more information, see Azure AD Identity Protection.
    Managed identities for Azure resourcesProvides your Azure services with an automatically managed identity in Azure AD that can authenticate any Azure AD-supported authentication service, including Key Vault. For more information, see What is managed identities for Azure resources?.
    Privileged identity management (PIM)Manage, control, and monitor access within your organization. This feature includes access to resources in Azure AD and Azure, and other Microsoft Online Services, like Office 365 or Intune. For more information, see Azure AD Privileged Identity Management.
    Reports and monitoringGain insights into the security and usage patterns in your environment.

    Lab 09: Publish and subscribe to Event Grid events

      Microsoft Azure user interface Given the dynamic nature of Microsoft cloud tools, you might experience Azure UI changes that occur after t...