In this article, we will learn how to upload or download a single file into a folder in ASP.NET MVC 5. First, we have to create a table for the stored file's info, like name, and create a path to the database.
Create Table
Open SQL Server to create a database with any suitable name and then create a table.
Here, I am using DemoTest as the database name and tblFileDetails as the table name.
Table Structure
- CREATE TABLE [dbo].[tblFileDetails](
- [SQLID] [int] IDENTITY(1,1) NOT NULL,
- [FILENAME] [nvarchar](500) NULL,
- [FILEURL] [nvarchar](1500) NULL
- )
Creating MVC Application
Now, I am going to create a sample application. Open Visual Studio. Go to File->New->Project. Give FileUploadDownload as project name or give a suitable name to the application. Click OK.

Now, select MVC as a template and then click OK.

Now we add a folder to the application where we store all uploaded files and name it as UploadedFiles.
We have created a project called “FileUploadDownload“ and now, we are going to add a Model class for file upload.
Right-click on “MODELS” folder and add a class name as "FileUpload".
Add the below code to FileUpload model class.
Code for FileUpload.cs
- using System;
- using System.Collections.Generic;
- using System.Linq;
- using System.Web;
- namespace FileUploadDownload.Models
- {
- public class FileUpload
- {
- public string FileId { get; set; }
- public string FileName { get; set; }
- public string FileUrl { get; set; }
- public IEnumerable<FileUpload> FileList { get; set; }
- }
- }
After adding Model class now we add a controller to the Controller folder.
Right-click on the controller. Add->Controller.
Select MVC 5 Controller as Empty. Click Add.
Give “FilesController” name to the controller.
Add the below code to the controller.
Code of FilesController
- using System;
- using System.IO;
- using System.Web;
- using System.Data;
- using System.Web.Mvc;
- using System.Data.SqlClient;
- using System.Collections.Generic;
- using FileUploadDownload.Models;
- namespace FileUploadDownload.Controllers
- {
- public class FilesController : Controller
- {
- string conString = "Data Source=.;Initial Catalog =DemoTest; integrated security=true;";
- // GET: Files
- public ActionResult Index(FileUpload model)
- {
- List<FileUpload> list = new List<FileUpload>();
- DataTable dtFiles = GetFileDetails();
- foreach (DataRow dr in dtFiles.Rows)
- {
- list.Add(new FileUpload
- {
- FileId = @dr["SQLID"].ToString(),
- FileName = @dr["FILENAME"].ToString(),
- FileUrl = @dr["FILEURL"].ToString()
- });
- }
- model.FileList = list;
- return View(model);
- }
- [HttpPost]
- public ActionResult Index(HttpPostedFileBase files)
- {
- FileUpload model = new FileUpload();
- List<FileUpload> list = new List<FileUpload>();
- DataTable dtFiles = GetFileDetails();
- foreach (DataRow dr in dtFiles.Rows)
- {
- list.Add(new FileUpload
- {
- FileId = @dr["SQLID"].ToString(),
- FileName = @dr["FILENAME"].ToString(),
- FileUrl = @dr["FILEURL"].ToString()
- });
- }
- model.FileList = list;
- if (files != null)
- {
- var Extension = Path.GetExtension(files.FileName);
- var fileName = "my-file-" + DateTime.Now.ToString("yyyyMMddHHmmssfff") + Extension;
- string path = Path.Combine(Server.MapPath("~/UploadedFiles"), fileName);
- model.FileUrl = Url.Content(Path.Combine("~/UploadedFiles/", fileName));
- model.FileName = fileName;
- if (SaveFile(model))
- {
- files.SaveAs(path);
- TempData["AlertMessage"] = "Uploaded Successfully !!";
- return RedirectToAction("Index", "Files");
- }
- else
- {
- ModelState.AddModelError("", "Error In Add File. Please Try Again !!!");
- }
- }
- else
- {
- ModelState.AddModelError("", "Please Choose Correct File Type !!");
- return View(model);
- }
- return RedirectToAction("Index", "Files");
- }
- private DataTable GetFileDetails()
- {
- DataTable dtData = new DataTable();
- SqlConnection con = new SqlConnection(conString);
- con.Open();
- SqlCommand command = new SqlCommand("Select * From tblFileDetails", con);
- SqlDataAdapter da = new SqlDataAdapter(command);
- da.Fill(dtData);
- con.Close();
- return dtData;
- }
- private bool SaveFile(FileUpload model)
- {
- string strQry = "INSERT INTO tblFileDetails (FileName,FileUrl) VALUES('" +
- model.FileName + "','" + model.FileUrl + "')";
- SqlConnection con = new SqlConnection(conString);
- con.Open();
- SqlCommand command = new SqlCommand(strQry, con);
- int numResult = command.ExecuteNonQuery();
- con.Close();
- if (numResult > 0)
- return true;
- else
- return false;
- }
- }
- }
After adding controller now we add a view to the controller.
For that right click on Index ActionResult. Go to Add View.
Then Select the empty template. Click add.
As you click on the Add button in Views-->File folder, the Index.cshtml file will be created.
Now, let's modify the Index.cshtml code.
Add the below code to Index.cshtml
Code for Index.cshtml
- @model FileUploadDownload.Models.FileUpload
- @{
- ViewBag.Title = "File Upload & Download";
- }
- @using (Html.BeginForm("Index", "Files", FormMethod.Post, new { enctype = "multipart/form-data" }))
- {
- @Html.AntiForgeryToken()
- <div class="row">
- <div class="col-md-10">
- <h2>File Upload</h2>
- <hr />
- @Html.ValidationSummary(true, "", new { @class = "text-danger" })
- <div class="form-group">
- <label class="col-md-2 control-label">Upload Image</label>
- <div class="col-md-10">
- <input type="file" id="files" name="files" class="form-control" required="required"><br />
- </div>
- </div>
- <div class="form-group">
- <div class="col-md-offset-2 col-md-10">
- <input type="submit" value="Upload" class="btn btn-default" />
- </div>
- </div>
- </div>
- </div>
- }
- <div class="row">
- <div class="col-md-10">
- <h2>Uploaded File Details</h2>
- <div class="form-group">
- <div>
- @{
- var grid = new WebGrid(source: Model.FileList, canPage: true, rowsPerPage: 15);
- @grid.GetHtml(tableStyle: "table table-striped table-bordered table-hover", headerStyle: "webgrid-header",
- alternatingRowStyle: "webgrid-alternating-row", selectedRowStyle: "webgrid-selected-row",
- footerStyle: "webgrid-footer", rowStyle: "webgrid-row-style", mode: WebGridPagerModes.All,
- firstText: "<< First", previousText: "< Prev", nextText: "Next >", lastText: "Last >>",
- htmlAttributes: new { id = "DataTable" },
- columns: grid.Columns(
- grid.Column("FileName", header: "FILE NAME", canSort: false),
- grid.Column("FileUrl", header: "FILE PATH", canSort: false),
- grid.Column(header: "DOWNLOAD", format:
- @<text>
- <a href="~/Files/DownloadFile?filePath=@item.FileUrl"><img src="~/Images/download.png" style="width: 15px; height: 15px" title="Download" /></a>
- </text>)
- ));
- }
- </div>
- </div>
- </div>
- </div>
- @section Scripts {
- @Scripts.Render("~/bundles/jqueryval")
- }
Now, we add the DownloadFile option to the controller. Switch to FilesController and add the below code.
Code for Download file
- public ActionResult DownloadFile(string filePath)
- {
- string fullName = Server.MapPath("~" + filePath);
- byte[] fileBytes = GetFile(fullName);
- return File(
- fileBytes, System.Net.Mime.MediaTypeNames.Application.Octet, filePath);
- }
- byte[] GetFile(string s)
- {
- System.IO.FileStream fs = System.IO.File.OpenRead(s);
- byte[] data = new byte[fs.Length];
- int br = fs.Read(data, 0, data.Length);
- if (br != fs.Length)
- throw new System.IO.IOException(s);
- return data;
- }
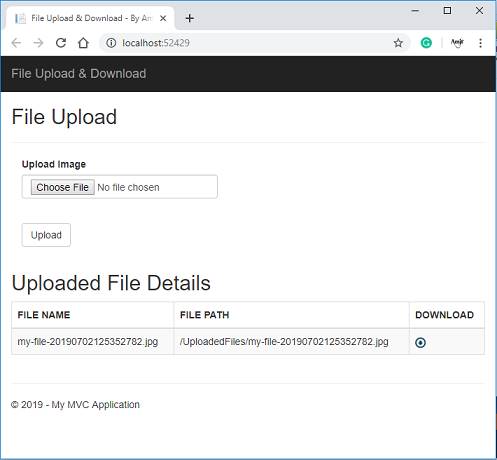
Now, build and run the project. It looks like the below image.

Now, choose a file and click on Upload. It will save the file to the UploadedFiles folder as well as save the data to the database.
For downloading the file, click on the "Download" image and it will download the particular file.

We have just learned how to upload and download the file in ASP.NET MVC.

No comments:
Post a Comment