An Azure storage account contains all of your Azure Storage data objects: blobs, files, queues, tables, and disks. The storage account provides a unique namespace for your Azure Storage data that is accessible from anywhere in the world over HTTP or HTTPS. Data in your Azure storage account is durable and highly available, secure, and massively scalable.
Note:
If you don't have an Azure subscription, create a free account before you begin.
Sign in to the Azure portal.
Note:
This article has been
updated to use the new Azure PowerShell Az module. You can still use the
AzureRM module, which will continue to receive bug fixes until at least
December 2020.
To learn more about the
new Az module and AzureRM compatibility, see Introducing the new Azure PowerShell Az module. For Az module
installation instructions, see Install Azure PowerShell.
If you don't have an Azure subscription, create a free account before you begin.
Sign in to the Azure portal.
Create a storage account
Now you are ready to create your storage account.
Every storage account must belong to an Azure resource group. A resource group is a logical container for grouping your Azure services. When you create a storage account, you have the option to either create a new resource group, or use an existing resource group. This article shows how to create a new resource group.
A general-purpose v2 storage account provides access to all of the Azure Storage services: blobs, files, queues, tables, and disks. The steps outlined here create a general-purpose v2 storage account, but the steps to create any type of storage account are similar.
To create a general-purpose v2 storage account in the Azure portal, follow these steps:
- In the Azure portal, select All services. In the list of resources, type Storage Accounts. As you begin typing, the list filters based on your input. Select Storage Accounts.
- On the Storage Accounts window that appears, choose Add.
- Select the subscription in which to create the storage account.
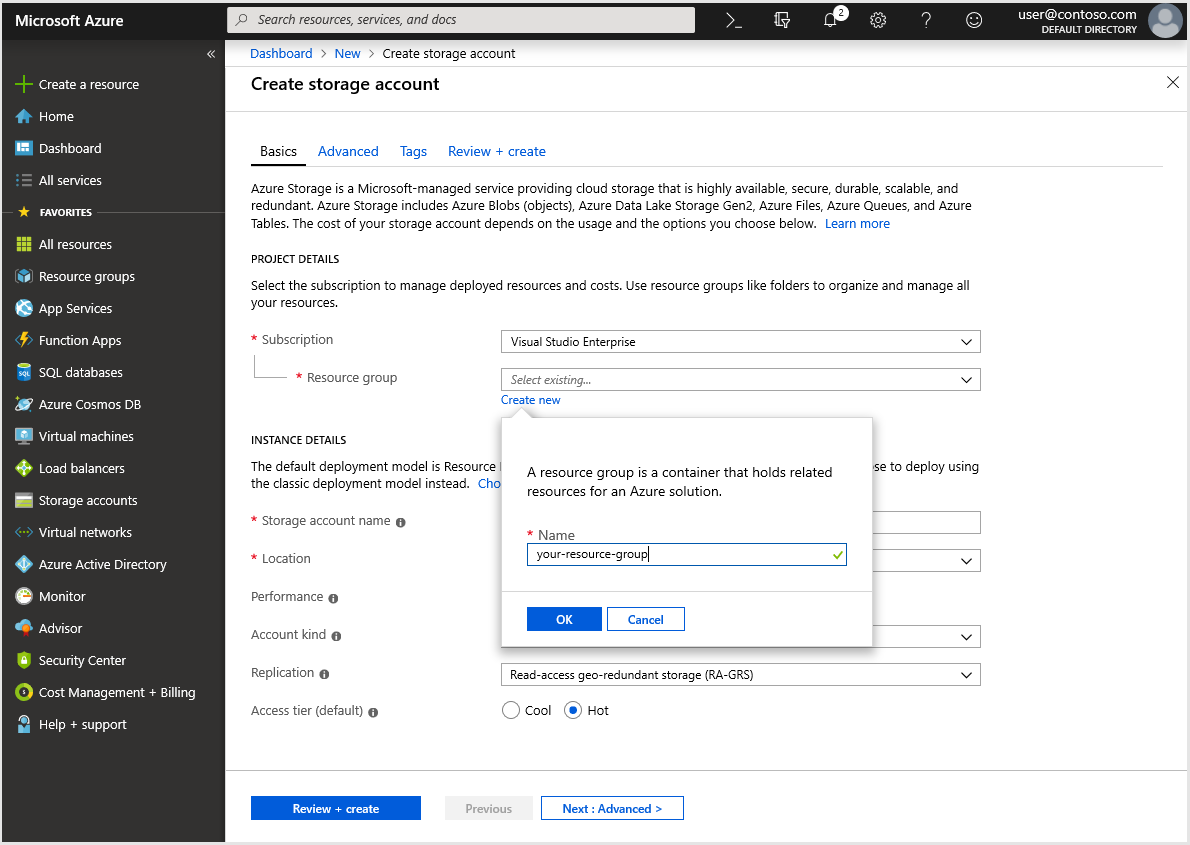
- Under the Resource group field, select Create new. Enter a name for your new resource group, as shown in the following image.

- Next, enter a name for your storage account. The name you choose must be unique across Azure. The name also must be between 3 and 24 characters in length, and can include numbers and lowercase letters only.
- Select a location for your storage account, or use the default location.
- Leave these fields set to their default values:
- Select Review + Create to review your storage account settings and create the account.
- Select Create.
Clean up resources
If you wish to clean up the resources created by this how-to article, you can delete the resource group. Deleting the resource group also deletes the associated storage account, and any other resources associated with the resource group.
To remove a resource group using the Azure portal:
- In the Azure portal, expand the menu on the left side to open the menu of services, and choose Resource Groups to display the list of your resource groups.
- Locate the resource group to delete, and right-click the More button (...) on the right side of the listing.
- Select Delete resource group, and confirm.

No comments:
Post a Comment