This set of Hadoop Multiple Choice Questions & Answers (MCQs) focuses on ” Spark with Hadoop – 1″.
1. Spark was initially started by ____________ at UC Berkeley AMPLab in 2009. a) Mahek Zaharia b) Matei Zaharia c) Doug Cutting d) Stonebraker View Answer
Answer: b Explanation: Apache Spark is an open-source cluster computing framework originally developed in the AMPLab at UC Berkeley.
2. Point out the correct statement. a) RSS abstraction provides distributed task dispatching, scheduling, and basic I/O functionalities b) For cluster manager, Spark supports standalone Hadoop YARN c) Hive SQL is a component on top of Spark Core d) None of the mentioned View Answer
Answer: b Explanation: Spark requires a cluster manager and a distributed storage system.
3. ____________ is a component on top of Spark Core. a) Spark Streaming b) Spark SQL c) RDDs d) All of the mentioned View Answer
Answer: b Explanation: Spark SQL introduces a new data abstraction called SchemaRDD, which provides support for structured and semi-structured data.
4. Spark SQL provides a domain-specific language to manipulate ___________ in Scala, Java, or Python. a) Spark Streaming b) Spark SQL c) RDDs d) All of the mentioned View Answer
Answer: c Explanation: Spark SQL provides SQL language support, with command-line interfaces and ODBC/JDBC server.
5. Point out the wrong statement. a) For distributed storage, Spark can interface with a wide variety, including Hadoop Distributed File System (HDFS) b) Spark also supports a pseudo-distributed mode, usually used only for development or testing purposes c) Spark has over 465 contributors in 2014 d) All of the mentioned View Answer
Answer: d Explanation: Spark is the most active project in the Apache Software Foundation and among Big Data open source projects.
6. ______________ leverages Spark Core fast scheduling capability to perform streaming analytics. a) MLlib b) Spark Streaming c) GraphX d) RDDs View Answer
Answer: b Explanation: Spark Streaming ingests data in mini-batches and performs RDD transformations on those mini-batches of data.
7. ____________ is a distributed machine learning framework on top of Spark. a) MLlib b) Spark Streaming c) GraphX d) RDDs View Answer
Answer: a Explanation: MLlib implements many common machine learning and statistical algorithms to simplify large scale machine learning pipelines.
8. ________ is a distributed graph processing framework on top of Spark. a) MLlib b) Spark Streaming c) GraphX d) All of the mentioned View Answer
Answer: c Explanation: GraphX started initially as a research project at UC Berkeley AMPLab and Databricks, and was later donated to the Spark project.
9. GraphX provides an API for expressing graph computation that can model the __________ abstraction. a) GaAdt b) Spark Core c) Pregel d) None of the mentioned View Answer
Answer: c Explanation: GraphX is used for machine learning.
10. Spark architecture is ___________ times as fast as Hadoop disk-based Apache Mahout and even scales better than Vowpal Wabbit. a) 10 b) 20 c) 50 d) 100 View Answer
Answer: a Explanation: Spark architecture has proven scalability to over 8000 nodes in production.
Sanfoundry Global Education & Learning Series – Hadoop.
In the upper right corner, click the + sign icon, then choose New repository. This will take you to a page where you can enter a repository name (this tutorial uses test-repo as the repository name), description, and choose to initialize with a README (a good idea!).
It is a good idea to add a .gitignore file by selecting one of the languages from the drop down menu, though for this tutorial it will not be necessary.
Similarly, in practice you should choose a license to that people know whether and how they can use your code.
Once you have entered a repository name and made your selection, select Create repository, and you will be taken to your new repository web page.
Git at the command line
Below you will learn a series of commands that you can run at the command line in git bash, terminal of whatever bash tool you are using. There are 2 types of commands that you will use
Bash commands: These are commands that are native to bash / shell. They allow you to navigate around your computer, explore directory structures, create and manipulate files and directories, and more. (e.g. ls, cd, mkdir, etc)
Git commands: These are commands that are specific to git and will only be available if you have git installed on your computer. Git specific commands will always started with a call to git (e.g. git status, git clone, etc)
Clone your repository to your local machine
Next, clone your newly created repository from GitHub to your local computer. From your repository page on GitHub, click the green button labeled Clone or download, and in the “Clone with HTTPs” section, copy the URL for your repository.
Next, on your local machine, open your bash shell and change your current working directory to the location where you would like to clone your repository. Note that here we are using a bash command - cd (change directory).
For example, on a Unix based system, if you wanted to have your repository in your Documents folder, you change directories as follows:
cd Documents
Once you have navigated to the directory where you want to put your repository, you can use:
Note: The repository name and output numbers that you see on your computer, representing the total file size, etc, may differ from the example provided above.
To verify that your repository now exists locally, type ls in your terminal. The ls command lists the files & folders available in your current directory. You should see a directory with the same name as the repository that you created previously on GitHub.
Tracking changes with git add and git commit
Next use cd to change directories using the syntax:
cd my-repo-name
Replace my-repo-name with the folder name of your repo (this should be your repo name - e.g. 14ers-git)
cd test-repo
If you list all the files in this directory (using ls -a), you should see all of the files that exist in your GitHub repository:
ls-a
.git .gitignore LICENSE README.md
Alternatively, we can view the local repository in the finder (Mac), a Windows Explorer (Windows) window, or GUI file browser (Linux).
Simply open your file browser and navigate to the new local repo.
Important Tip The .git element is listed when you use the ls -a command shows up is actually a directory which will keep track of your changes (the commits that you make) in git. Warning: Do not edit the files in this directory manually!
Using either method, we can see that the file structure of our cloned repo mirrors the file structure of our forked GitHub repo.
Edit a file in your repo
Next, open up your favorite text editor and make a few edits to the README.md file. Save your changes.
Once you are happy with your changes and have saved them, go back to your terminal window and type git status and hit return to execute the command.
git status
On branch master
Your branch is up-to-date with 'origin/master'.
Changes not staged for commit:
  (use "git add <file>..." to update what will be committed)
  (use "git checkout -- <file>..." to discard changes in working directory)

	modified:   README.md

no changes added to commit (use "git add" and/or "git commit -a")
The output from git status indicates that you have modified the file README.md. To keep track of this change to this file, you need to
add the changes, then
commit the changes.
Add and commit changes
You will use the add and commit functions to add and commit changes that you make to git.
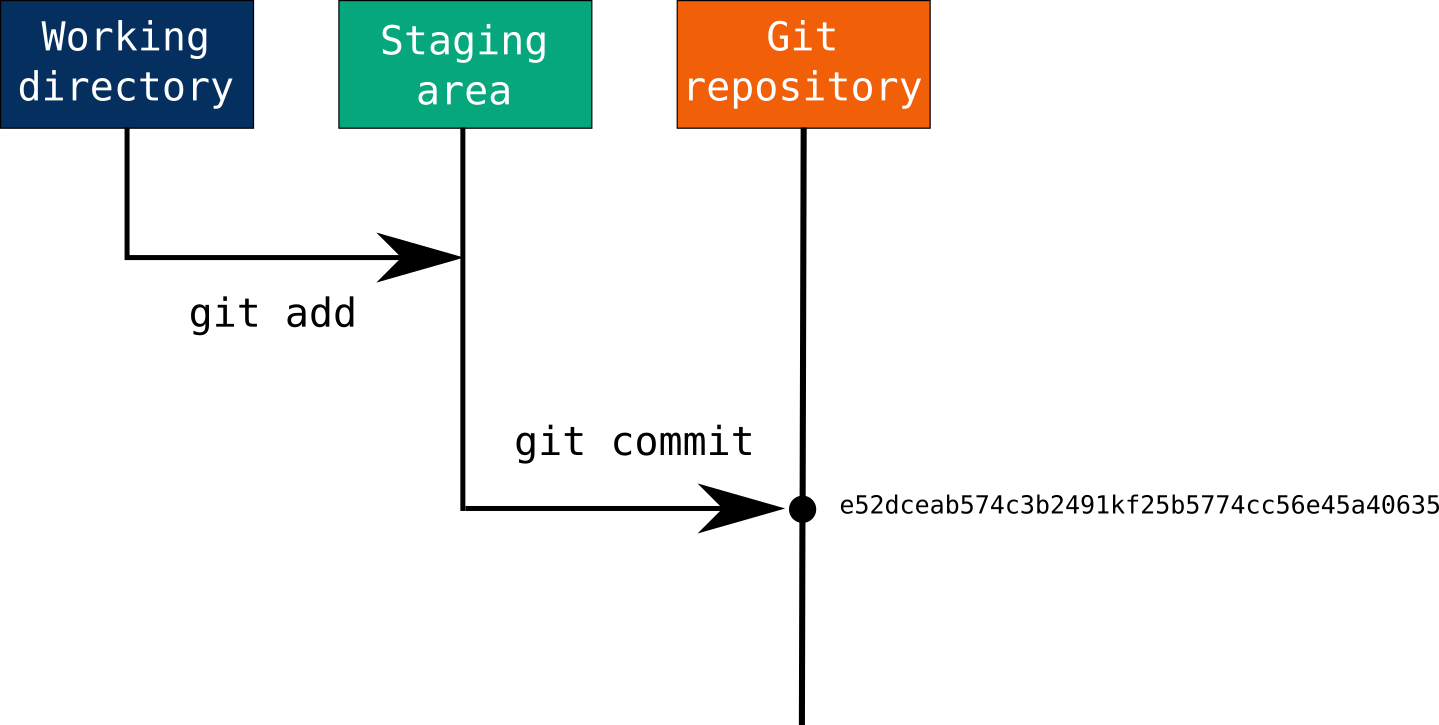
git add: takes a modified file in your working directory and places the modified version in a staging area.
git commit takes everything from the staging area and makes a permanent snapshot of the current state of your repository that is associated with a unique identifier.
These two commands make up the bulk of many workflows that use git for version control.
Modified files are staged using git add, and following a commit, all files in the staging area are snapshotted and become part of the repository's history, receiving a unique SHA-1 hash identifier. Source: Maxwell Joseph, adapted from Pro Git by Chacon and Straub (2014).
Add files
You can add an individual file or groups of files to git tracking. To add a single file, use
git add file-name-here-with-extension
To add the README.md file that you just modified, you’d use:
git add README.md
To add ALL of the files that you have edited at the same time, you can use:
git add --all
Use git add --all with caution. You do not want to accidentally add things like credential files, .DS_Store files, or history files.
Commit files
Once you are ready to make a snapshot of the current state of your repository, you can use git commit. The git commit command requires a commit message that describes the snapshot / changes that you made in that commit.
A commit message should outline what changed and why. These messages
help collaborators and your future self understand what was changed and why
allow you and your collaborators to find (and undo if necessary) changes that were previously made.
If you are not committing a lot of changes, you can create a short one line commit message using the -m flag:
git commit -m"Editing the README to try out git add/commit"
Alternatively, if you are committing many changes, or a small number of changes that require explanation, you’ll want to write a detailed multi-line commit message using a text editor.
If you have configured git to use your favorite text editor (via git config --global core.editor your-fav-editor-here), then you can open that editor to write your commit message using the git commit command:
git commit
Once you save your commit message and exit the text editor, the file that you created will contain your commit message.
1) a,d, 2) a, 3) b, 4) c,d, 5) c, 6) a, 7) b, 8) d, 9) c, 10) a
1. Event binding can be defined . . . . . . . . .
A) by wrapping the event in (parenthesis) B) by prefixing it with in- C) by wrapping the event in {curly brackets} D) by prefixing it with on-
2. EventEmitter class acts both as an observer and observable.
A) True B) False
3. Events in Angular 2 behave like normal DOM events. They can bubble up but cannot propagate down.
A) True B) False
4. EventEmitter class’s simple interface, which basically encompass two methods . . . . . . . . . can therefore be used to trigger custom events and listen to events as well, both synchronously or asynchronously.
A) exit() B) superscript() C) subscribe() D) emit()
5. Angular framework provides event binding using in-built event as well as custom event. Custom events are the EventEmitter instances. To create a custom event we need to create an instance of EventEmitter annotated by . . . . . . .
A) @Input() B) @Get() C) @Output() D) @Set()
6. EventEmitter class is used by directives and components to emit custom Events.
A) True B) False
7. @Output() myEvent = new EventEmitter();
A) Declares an output property that fires events that you cannot subscribe to with an event binding. B) Declares an output property that fires events that you can subscribe to with an event binding.
C) Declares an output property that overrides events that you can subscribe to with an event binding. D) Declares an output property that subscribes events that you can subscribe to with an event binding.
8. . . . . . . . . need to be passed as a parameter in the event callback from the template to capture the event object.
A) $event.start B) $events C) $eventobj D) $event
9. Calling . . . . . . . . on the event prevents propagation.
A) stopEventPropagation B) preventEventPropagation C) stopPropagation D) preventPropagation
10. Events on child elements are propagated upwards, and hence event binding is also possible on a parent element.