Create an account
Azure portal
- Sign in to the Azure portal.
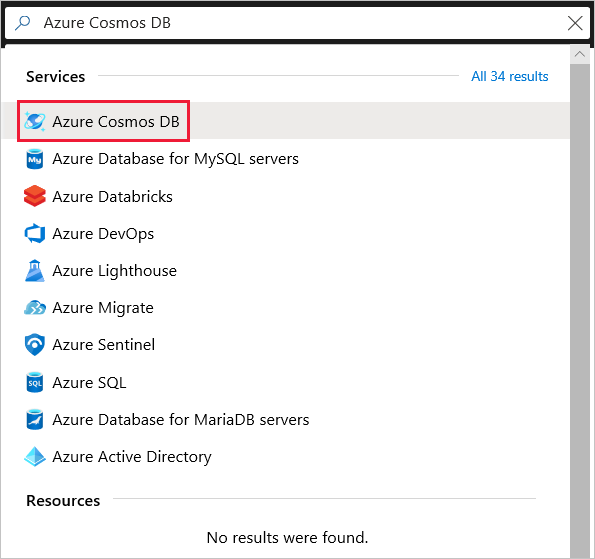
- Select Create a resource > Databases > Azure Cosmos DB.

- On the Create Azure Cosmos DB Account page, enter the basic settings for the new Azure Cosmos account.

- Select Review + create. You can skip the Network and Tags sections.
- Review the account settings, and then select Create. It takes a few minutes to create the account. Wait for the portal page to display Your deployment is complete.

- Select Go to resource to go to the Azure Cosmos DB account page.

Azure CLI
Azure CLI
# Create an account
$resourceGroupName = 'myResourceGroup'
$accountName = 'myaccountname' # must be lower case.

az cosmosdb create \
   --name $accountName \
   --resource-group $resourceGroupName \
   --kind GlobalDocumentDB \
   --default-consistency-level Session \
   --locations regionName=WestUS failoverPriority=0 isZoneRedundant=False \
   --locations regionName=EastUS failoverPriority=1 isZoneRedundant=False \
   --enable-multiple-write-locations true
Azure PowerShell
Azure PowerShell
# Create an Azure Cosmos account for Core (SQL) API
$resourceGroupName = "myResourceGroup"
$location = "West US"
$accountName = "mycosmosaccount" # must be lower case.

$locations = @(
    @{ "locationName"="West US"; "failoverPriority"=0 },
    @{ "locationName"="East US"; "failoverPriority"=1 }
)

$consistencyPolicy = @{
    "defaultConsistencyLevel"="BoundedStaleness";
    "maxIntervalInSeconds"=300;
    "maxStalenessPrefix"=100000
}

$CosmosDBProperties = @{
    "databaseAccountOfferType"="Standard";
    "locations"=$locations;
    "consistencyPolicy"=$consistencyPolicy;
    "enableMultipleWriteLocations"="true"
}

New-AzResource -ResourceType "Microsoft.DocumentDb/databaseAccounts" `
    -ApiVersion "2015-04-08" -ResourceGroupName $resourceGroupName -Location $location `
    -Name $accountName -PropertyObject $CosmosDBProperties
Azure Resource Manager template
This Azure Resource Manager template will create an Azure Cosmos account for any supported API configured with two regions and options to select consistency level, automatic failover, and multi-master. To deploy this template, click on Deploy to Azure on the readme page, Create Azure Cosmos account
Add/remove regions from your database account
Azure portal
- Sign in to Azure portal.
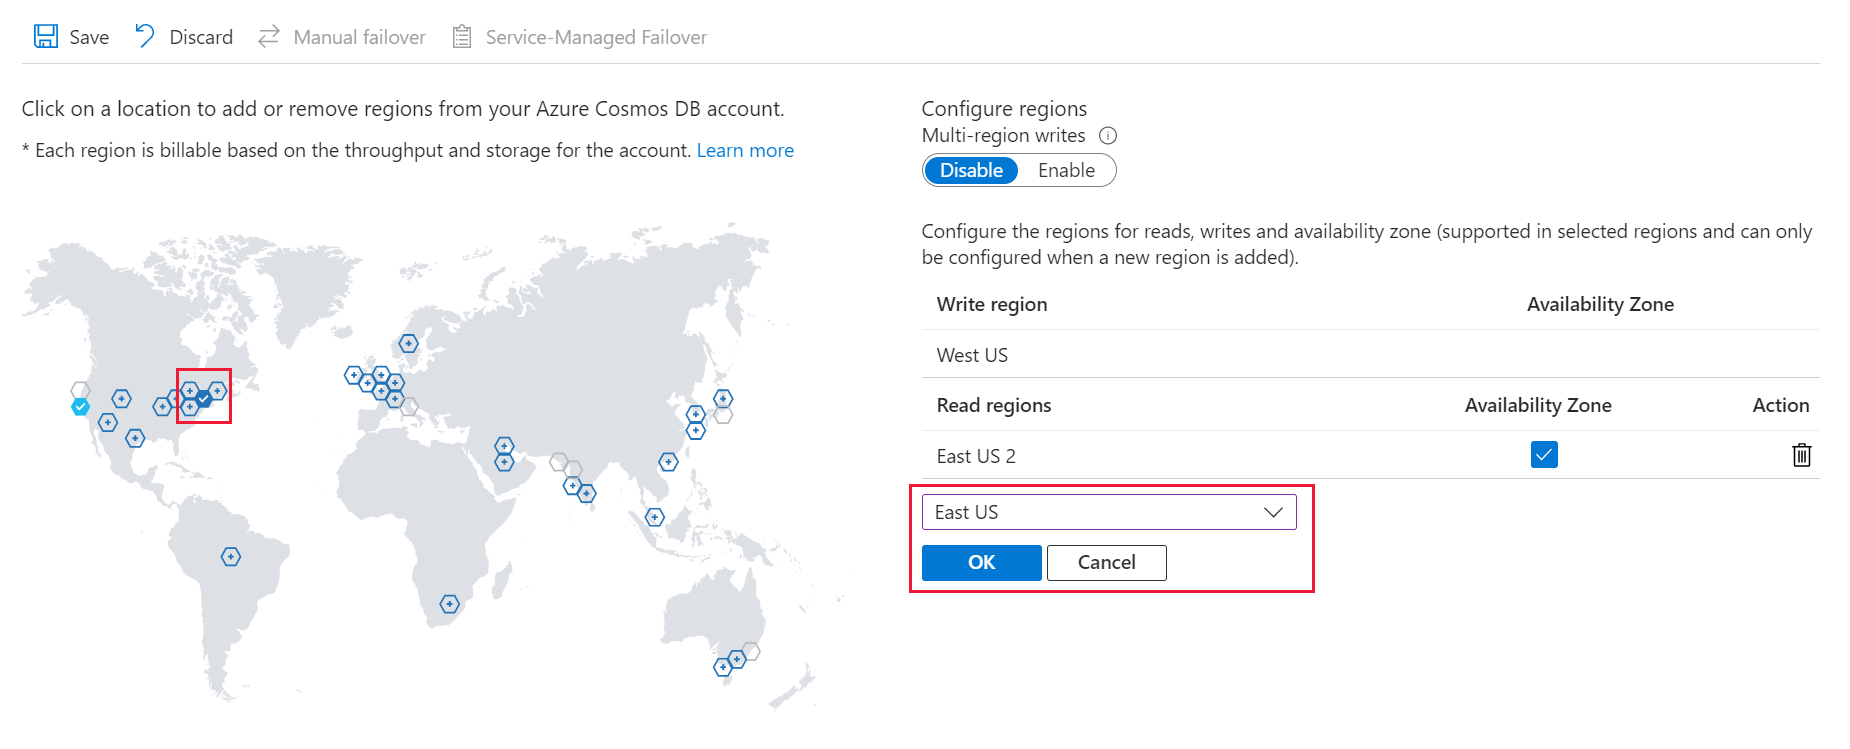
- Go to your Azure Cosmos account, and open the Replicate data globally menu.
- To add regions, select the hexagons on the map with the + label that corresponds to your desired region(s). Alternatively, to add a region, select the + Add region option and choose a region from the drop-down menu.
- To remove regions, clear one or more regions from the map by selecting the blue hexagons with check marks. Or select the "wastebasket" (🗑) icon next to the region on the right side.
- To save your changes, select OK.

In a single-region write mode, you cannot remove the write region. You must fail over to a different region before you can delete the current write region.
In a multi-region write mode, you can add or remove any region, if you have at least one region.
Azure CLI
Azure CLI
$resourceGroupName = 'myResourceGroup'
$accountName = 'myaccountname'

# Create an account with 1 region
az cosmosdb create --name $accountName --resource-group $resourceGroupName --locations regionName=westus failoverPriority=0 isZoneRedundant=False

# Add a region
az cosmosdb update --name $accountName --resource-group $resourceGroupName --locations regionName=westus failoverPriority=0 isZoneRedundant=False --locations regionName=EastUS failoverPriority=1 isZoneRedundant=False

# Remove a region
az cosmosdb update --name $accountName --resource-group $resourceGroupName --locations regionName=westus failoverPriority=0 isZoneRedundant=False
Azure PowerShell
Azure PowerShell
# Create an account with 1 region
$resourceGroupName = "myResourceGroup"
$location = "West US"
$accountName = "mycosmosaccount" # must be lower case.

$locations = @( @{ "locationName"="West US"; "failoverPriority"=0 } )
$consistencyPolicy = @{ "defaultConsistencyLevel"="Session" }
$CosmosDBProperties = @{
    "databaseAccountOfferType"="Standard";
    "locations"=$locations;
    "consistencyPolicy"=$consistencyPolicy
}
New-AzResource -ResourceType "Microsoft.DocumentDb/databaseAccounts" `
    -ApiVersion "2015-04-08" -ResourceGroupName $resourceGroupName -Location $location `
    -Name $accountName -PropertyObject $CosmosDBProperties

# Add a region
$account = Get-AzResource -ResourceType "Microsoft.DocumentDb/databaseAccounts" `
    -ApiVersion "2015-04-08" -ResourceGroupName $resourceGroupName -Name $accountName

$locations = @(
    @{ "locationName"="West US"; "failoverPriority"=0 },
    @{ "locationName"="East Us"; "failoverPriority"=1 }
)

$account.Properties.locations = $locations
$CosmosDBProperties = $account.Properties

Set-AzResource -ResourceType "Microsoft.DocumentDb/databaseAccounts" `
    -ApiVersion "2015-04-08" -ResourceGroupName $resourceGroupName `
    -Name $accountName -PropertyObject $CosmosDBProperties

# Azure Resource Manager does not wait on the resource update
Write-Host "Confirm region added before continuing..."

# Remove a region
$account = Get-AzResource -ResourceType "Microsoft.DocumentDb/databaseAccounts" `
    -ApiVersion "2015-04-08" -ResourceGroupName $resourceGroupName -Name $accountName

$locations = @( @{ "locationName"="West US"; "failoverPriority"=0 } )

$account.Properties.locations = $locations
$CosmosDBProperties = $account.Properties

Set-AzResource -ResourceType "Microsoft.DocumentDb/databaseAccounts" `
    -ApiVersion "2015-04-08" -ResourceGroupName $resourceGroupName `
    -Name $accountName -PropertyObject $CosmosDBProperties
Configure multiple write-regions
Azure portal
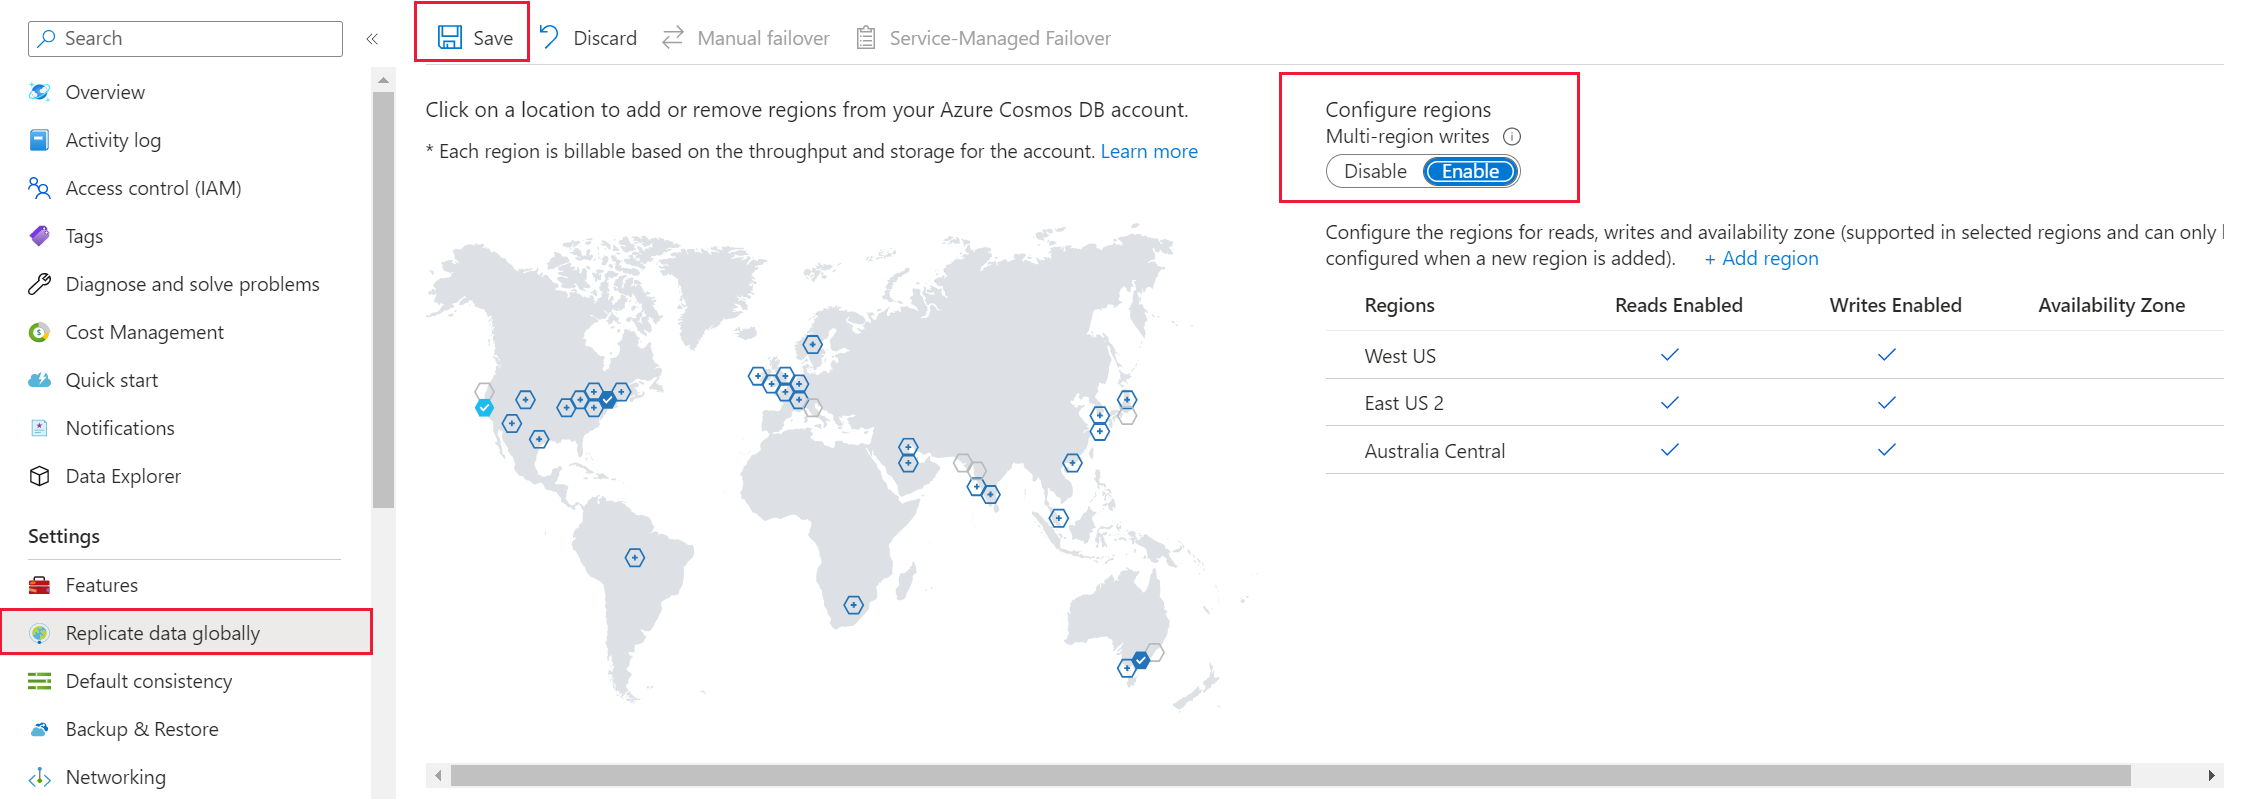
Open the Replicate Data Globally tab and select Enable to enable multi-region writes. After you enable multi-region writes, all the read regions that you currently have on the account will become read and write regions.
Note
After you enable multi-region writes, you cannot disable it.

Please reach out to the askcosmosdb@microsoft.com alias for additional questions about this feature.
Azure CLI
Azure CLI
$resourceGroupName = 'myResourceGroup'
$accountName = 'myaccountname'
az cosmosdb update --name $accountName --resource-group $resourceGroupName --enable-multiple-write-locations true
Azure PowerShell
Azure PowerShell
# Update an Azure Cosmos account from single to multi-master

$account = Get-AzResource -ResourceType "Microsoft.DocumentDb/databaseAccounts" `
    -ApiVersion "2015-04-08" -ResourceGroupName $resourceGroupName -Name $accountName

$account.Properties.enableMultipleWriteLocations = "true"
$CosmosDBProperties = $account.Properties

Set-AzResource -ResourceType "Microsoft.DocumentDb/databaseAccounts" `
    -ApiVersion "2015-04-08" -ResourceGroupName $resourceGroupName `
    -Name $accountName -PropertyObject $CosmosDBProperties
Resource Manager template
An account can be migrated from single-master to multi-master by deploying the Resource Manager template used to create the account and setting
enableMultipleWriteLocations: true. The following Azure Resource Manager template is a bare minimum template that will deploy an Azure Cosmos account for SQL API with a single region and multi-master enabled.
JSON
{
    "$schema": "https://schema.management.azure.com/schemas/2015-01-01/deploymentTemplate.json#",
    "contentVersion": "1.0.0.0",
    "parameters": {
        "name": {
            "type": "String"
        },
        "location": {
            "type": "String",
            "defaultValue": "[resourceGroup().location]"
        }
    },
    "resources": [
        {
            "type": "Microsoft.DocumentDb/databaseAccounts",
            "kind": "GlobalDocumentDB",
            "name": "[parameters('name')]",
            "apiVersion": "2015-04-08",
            "location": "[parameters('location')]",
            "tags": {},
            "properties": {
                "databaseAccountOfferType": "Standard",
                "consistencyPolicy": { "defaultConsistencyLevel": "Session" },
                "locations": [
                    {
                        "locationName": "[parameters('location')]",
                        "failoverPriority": 0
                    }
                ],
                "enableMultipleWriteLocations": true
            }
        }
    ]
}
Enable automatic failover for your Azure Cosmos account
The Automatic failover option allows Azure Cosmos DB to failover to the region with the highest failover priority with no user action should a region become unavailable. When automatic failover is enabled, region priority can be modified. Account must have two or more regions to enable automatic failover.
Azure portal
- From your Azure Cosmos account, open the Replicate data globally pane.
- At the top of the pane, select Automatic Failover.

- On the Automatic Failover pane, make sure that Enable Automatic Failover is set to ON.
- Select Save.

Azure CLI
Azure CLI
# Enable automatic failover on an existing account
$resourceGroupName = 'myResourceGroup'
$accountName = 'myaccountname'

az cosmosdb update --name $accountName --resource-group $resourceGroupName --enable-automatic-failover true
Azure PowerShell
Azure PowerShell
$resourceGroupName = "myResourceGroup"
$accountName = "mycosmosaccount"

$account = Get-AzResource -ResourceType "Microsoft.DocumentDb/databaseAccounts" `
    -ApiVersion "2015-04-08" -ResourceGroupName $resourceGroupName `
    -Name $accountName

$account.Properties.enableAutomaticFailover="true";
$CosmosDBProperties = $account.Properties;

Set-AzResource -ResourceType "Microsoft.DocumentDb/databaseAccounts" `
    -ApiVersion "2015-04-08" -ResourceGroupName $resourceGroupName `
    -Name $accountName -PropertyObject $CosmosDBProperties
Set failover priorities for your Azure Cosmos account
After a Cosmos account is configured for automatic failover, the failover priority for regions can be changed.
Important
You cannot modify the write region (failover priority of zero) when the account is configured for automatic failover. To change the write region, you must disable automatic failover and do a manual failover.
Azure portal
- From your Azure Cosmos account, open the Replicate data globally pane.
- At the top of the pane, select Automatic Failover.

- On the Automatic Failover pane, make sure that Enable Automatic Failover is set to ON.
- To modify the failover priority, drag the read regions via the three dots on the left side of the row that appear when you hover over them.
- Select Save.

Azure CLI
Azure CLI
# Assume region order is initially eastus=0 westus=1 southeastasia=2 on account creation
$resourceGroupName = 'myResourceGroup'
$accountName = 'myaccountname'

az cosmosdb failover-priority-change --name $accountName --resource-group $resourceGroupName --failover-policies eastus=0 southeastasia=1 westus=2
Azure PowerShell
Azure PowerShell
# Assume account currently has regions with priority: West US = 0, East US = 1, Southeast Asia = 2
$resourceGroupName = "myResourceGroup"
$accountName = "myaccountname"

$failoverPolicies = @(
    @{ "locationName"="West US"; "failoverPriority"=0 },
    @{ "locationName"="Southeast Asia"; "failoverPriority"=1 },
    @{ "locationName"="East US"; "failoverPriority"=2 }
)

Invoke-AzResourceAction -Action failoverPriorityChange `
    -ResourceType "Microsoft.DocumentDb/databaseAccounts" -ApiVersion "2015-04-08" `
    -ResourceGroupName $resourceGroupName -Name $accountName -Parameters $failoverPolicies
Perform manual failover on an Azure Cosmos account
Important
The Azure Cosmos account must be configured for manual failover for this operation to succeed.
The process for performing a manual failover involves changing the account's write region (failover priority = 0) to another region configured for the account.
Note
Multi-master accounts cannot be manually failed over. For applications using the Azure Cosmos SDK, the SDK will detect when a region becomes unavailable, then redirect automatically to the next closest region if using multi-homing API in the SDK.
Azure portal
- Go to your Azure Cosmos account, and open the Replicate data globally menu.
- At the top of the menu, select Manual Failover.

- On the Manual Failover menu, select your new write region. Select the check box to indicate that you understand this option changes your write region.
- To trigger the failover, select OK.

Azure CLI
Azure CLI
# Assume account currently has regions with priority: eastus=0 westus=1
# Change the priority order to trigger a failover of the write region
$resourceGroupName = 'myResourceGroup'
$accountName = 'myaccountname'

az cosmosdb update --name $accountName --resource-group $resourceGroupName --locations regionName=westus failoverPriority=0 isZoneRedundant=False --locations regionName=eastus failoverPriority=1 isZoneRedundant=False
Azure PowerShell
Azure PowerShell
# Assume account currently has regions with priority: West US = 0, East US = 1
# Change the priority order to trigger a failover of the write region
$resourceGroupName = "myResourceGroup"
$accountName = "myaccountname"

$account = Get-AzResource -ResourceType "Microsoft.DocumentDb/databaseAccounts" `
    -ApiVersion "2015-04-08" -ResourceGroupName $resourceGroupName `
    -Name $accountName

$locations = @(
    @{ "locationName"="East US"; "failoverPriority"=0 },
    @{ "locationName"="West US"; "failoverPriority"=1 }
)

$account.Properties.locations=$locations;
$CosmosDBProperties = $account.Properties;

Set-AzResource -ResourceType "Microsoft.DocumentDb/databaseAccounts" `
    -ApiVersion "2015-04-08" -ResourceGroupName $resourceGroupName `
    -Name $accountName -PropertyObject $CosmosDBProperties
No comments:
Post a Comment