What is a web app?
Web Apps are probably the most familiar of the App Services to IT pros. Most of us have deployed a web site with a hosting company such as WordPress or GoDaddy. Web Apps takes that concept and turns it into an enterprise service. You can deploy simple/free websites for test/dev but you can step that up:
- Scaled-out/load balanced web apps
- Continuous deployment to deploy new code using services, such as GitHub or Visual Studio Team Services
- Slot management to enable dev/test/production deployment but can also be used for staged deployment where x percentage of clients hit a new version of the code
Web Apps is the first piece of Azure PaaS that I have focused on, but in trying to learn more about the architecture of the service, I have stumbled into learning more about the Service Fabric.
Create a web app
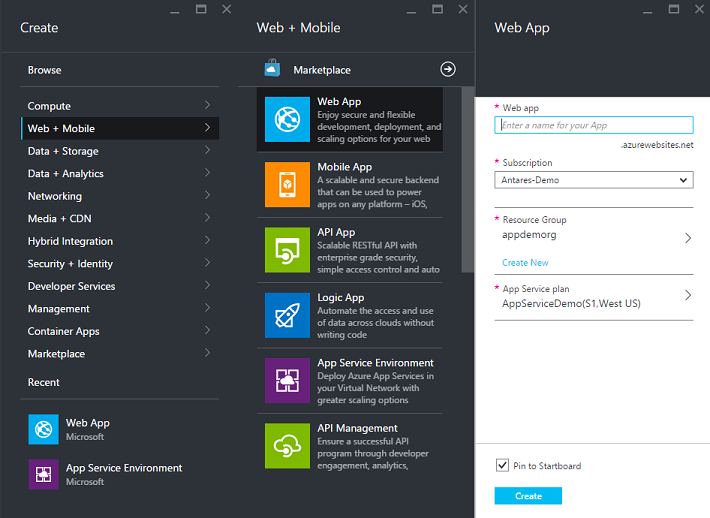
- In the Azure Portal, click Create a resource > Web + Mobile > Web App.

- Select your subscription.If you have multiple subscriptions be aware that to create an app in your App Service Environment, you need to use the same subscription that you used when creating the environment.
- Select or create a resource group.Resource groups enable you to manage related Azure resources as a unit and are useful when establishing role-based access control (RBAC) rules for your apps. For more information, see Azure Resource Manager overview.
- Select or create an App Service plan.App Service plans are managed sets of web apps. Normally when you select pricing, the price charged is applied to the App Service plan rather than to the individual apps. In an ASE you pay for the compute instances allocated to the ASE rather than what you have listed with your ASP. To scale up the number of instances of a web app you scale up the instances of your App Service plan and it affects all of the web apps in that plan. Some features such as site slots or VNET Integration also have quantity restrictions within the plan. For more information, see Azure App Service plans overviewYou can identify the App Service plans in your ASE by looking at the location that is noted under the plan name.
 If you want to use an App Service plan that already exists in your App Service Environment, select that plan. If you want to create a new App Service plan, see the following section of this tutorial, Create an App Service plan in an App Service Environment.
 - Enter the name for your web app, and then click Create.If your ASE uses an External VIP the URL of an app in an ASE is: [sitename].[name of your App Service Environment].p.azurewebsites.net instead of [sitename].azurewebsites.netIf your ASE uses an Internal VIP then the URL of an app in that ASE is: [sitename].[subdomain specified during ASE creation]
After you select your ASP during ASE creation you will see the subdomain update below Name
Create an App Service plan
When you create an App Service plan in an App Service Environment, your worker choices are different as there are no shared workers in an ASE. The workers you have to use are the ones that have been allocated to the ASE by the admin. This means that to create a new plan, you need to have more workers allocated to your ASE worker pool than the total number of instances across all of your plans already in that worker pool. If you don't have enough workers in your ASE worker pool to create your plan, you need to work with your ASE admin to get them added.
Another difference with App Service plans hosted by an App Service Environment is the lack of pricing selection. When you have an App Service Environment you are paying for compute resources used by the system and do not have added charges for the plans in that environment. Normally when you create an App Service plan you select a pricing plan which determines your billing. An App Service Environment is essentially a private location where you can create content. You pay for the environment and not to host your content.
The following instructions show how to create an App Service plan while you are creating a web app as explained in the previous section of the tutorial.
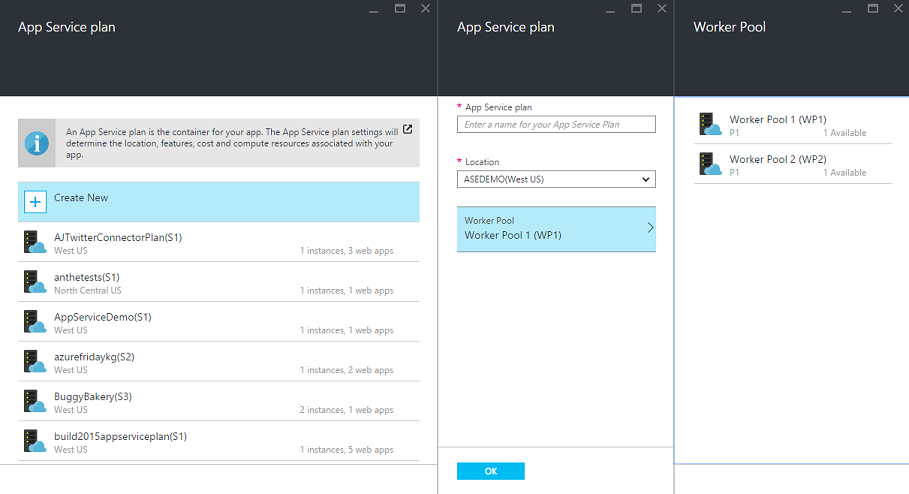
- Click Create New in the plan selection UI and provide a name for your plan just as you normally would outside of an ASE.
- Select the ASE that you want to use from your location picker.Because an App Service Environment is essentially a private deployment location, it shows under Location.
 After selection of an ASE in the location picker, the App Service plan creation UI updates. The location now shows the name of the ASE system and the region it is in, and the pricing plan picker is replaced with a worker pool picker.
Selecting a worker pool
Normally in Azure App Service and outside of an App Service Environment, there are 3 compute sizes that are available with the selection of a dedicated price plan. In a similar fashion, for an ASE you can define up to 3 pools of workers and specify the compute size that is used for that worker pool. What that means for tenants of the ASE is that instead of selecting a pricing plan with compute size for your App Service plan, you select what is called a worker pool.
The worker pool selection UI shows the compute size used for that worker pool below the name. The quantity available refers to how many compute instances are available for use in that pool. The total pool may actually have more instances than this number but this value refers to simply how many are not in use. If you need to adjust your App Service Environment to add more compute resources see Configuring your App Service Environment.

In this example you see only two worker pools available. That is because the ASE administrator only allocated hosts into those two worker pools. The third would show up when there are VMs allocated into it.

No comments:
Post a Comment