Symfony provides various in-built tags to handle HTML forms easily and securely. Symfony’s Form component performs form creation and validation process. It connects the model and the view layer. It provides a set of form elements to create a full-fledged html form from pre-defined models. This chapter explains about Forms in detail.
Form Fields
Symfony framework API supports large group of field types. Let’s go through each of the field types in detail.
FormType
It is used to generate a form in Symfony framework. Its syntax is as follows −
use Symfony\Component\Form\Extension\Core\Type\TextType;
use Symfony\Component\Form\Extension\Core\Type\EmailType;
use Symfony\Component\Form\Extension\Core\Type\FormType;
// ...

$builder = $this->createFormBuilder($studentinfo);
$builder
   ->add('title', TextType::class);
Here, $studentinfo is an entity of type Student. createFormBuilder is used to create a HTML form. add method is used to add input elements inside the form. title refers to student title property. TextType::class refers to html text field. Symfony provides classes for all html elements.
TextType
The TextType field represents the most basic input text field. Its syntax is as follows −
use Symfony\Component\Form\Extension\Core\Type\TextType;
$builder->add(‘name’, TextType::class);
Here, the name is mapped with an entity.
TextareaType
Renders a textarea HTML element. Its syntax is as follows −
use Symfony\Component\Form\Extension\Core\Type\TextareaType;
$builder->add('body', TextareaType::class, array(
   'attr' => array('class' => 'tinymce'),
));
EmailType
The EmailType field is a text field that is rendered using the HTML5 email tag. Its syntax is as follows −
use Symfony\Component\Form\Extension\Core\Type\EmailType;
$builder->add('token', EmailType::class, array(
   'data' => 'abcdef', ));
PasswordType
The PasswordType field renders an input password text box. Its syntax is as follows −
use Symfony\Component\Form\Extension\Core\Type\PasswordType;
$bulder->add('password', PasswordType::class);
RangeType
The RangeType field is a slider that is rendered using the HTML5 range tag. Its syntax is as follows −
use Symfony\Component\Form\Extension\Core\Type\RangeType;
// ...
$builder->add('name', RangeType::class, array(
   'attr' => array(
      'min' => 100,
      'max' => 200
   )
));
PercentType
The PercentType renders an input text field and specializes in handling percentage data. Its syntax is as follows −
use Symfony\Component\Form\Extension\Core\Type\PercentType;
// ...
$builder->add('token', PercentType::class, array(
   'data' => 'abcdef',
));
DateType
Renders a date format. Its syntax is as follows −
use Symfony\Component\Form\Extension\Core\Type\DateType;
// ...
$builder->add(‘joined’, DateType::class, array(
   'widget' => 'choice',
));
Here, Widget is the basic way to render a field.
It performs the following function.
- choice − Renders three select inputs. The order of the selects is defined in the format option.
- text − Renders a three field input of type text (month, day, year).
- single_text − Renders a single input of type date. The user's input is validated based on the format option.
CheckboxType
Creates a single input checkbox. This should always be used for a field that has a boolean value. Its syntax is as follows −
use Symfony\Component\Form\Extension\Core\Type\CheckboxType;
// ...
$builder-<add(‘sports’, CheckboxType::class, array(
   'label'    =< ‘Are you interested in sports?’,
   'required' =< false,
));
RadioType
Creates a single radio button. If the radio button is selected, the field will be set to the specified value. Its syntax is as follows −
use Symfony\Component\Form\Extension\Core\Type\RadioType;
// ...
$builder->add('token', RadioType::class, array(
   'data' => 'abcdef',
));
Note that, Radio buttons cannot be unchecked, the value only changes when another radio button with the same name gets checked.
RepeatedType
This is a special field “group”, that creates two identical fields whose values must match. Its syntax is as follows −
use Symfony\Component\Form\Extension\Core\Type\RepeatedType;
use Symfony\Component\Form\Extension\Core\Type\PasswordType;

// ...
$builder->add('password', RepeatedType::class, array(
   'type' => PasswordType::class,
   'invalid_message' => 'The password fields must match.',
   'options' => array('attr' => array('class' => 'password-field')),
   'required' => true,
   'first_options'  => array('label' => 'Password'),
   'second_options' => array('label' => 'Repeat Password'),
));
This is mostly used to check the user’s password or email.
ButtonType
A simple clickable button. Its syntax is as follows −
use Symfony\Component\Form\Extension\Core\Type\ButtonType;
// ...
$builder->add('save', ButtonType::class, array(
   'attr' => array('class' => 'save'),
));
ResetType
A button that resets all fields to its initial values. Its syntax is as follows −
use Symfony\Component\Form\Extension\Core\Type\ResetType;
// ...
$builder->add('save', ResetType::class, array(
   'attr' => array('class' => 'save'),
));
ChoiceType
A multi-purpose field is used to allow the user to “choose” one or more options. It can be rendered as a select tag, radio buttons, or checkboxes. Its syntax is as follows −
use Symfony\Component\Form\Extension\Core\Type\ChoiceType;
// ...
$builder->add(‘gender’, ChoiceType::class, array(
   'choices'  => array(
      ‘Male’ => true,
      ‘Female’ => false,
   ),
));
SubmitType
A submit button is used to submit form-data. Its syntax is as follows −
use Symfony\Component\Form\Extension\Core\Type\SubmitType;
// ...
$builder->add('save', SubmitType::class, array(
   'attr' => array('class' => 'save'),
))
Form Helper Function
Form helper functions are twig functions used to create forms easily in templates.
form_start
Returns an HTML form tag that points to a valid action, route, or URL. Its syntax is as follows −
{{ form_start(form, {'attr': {'id': 'form_person_edit'}}) }}
form_end
Closes the HTML form tag created using form_start. Its syntax is as follows −
{{ form_end(form) }}
textarea
Returns a textarea tag, optionally wrapped with an inline rich-text JavaScript editor.
checkbox
Returns an XHTML compliant input tag with type=“checkbox”. Its syntax is as follows −
echo checkbox_tag('choice[]', 1);
echo checkbox_tag('choice[]', 2);
echo checkbox_tag('choice[]', 3);
echo checkbox_tag('choice[]', 4);
input_password_tag
Returns an XHTML compliant input tag with type = “password”. Its syntax is as follows −
echo input_password_tag('password');
echo input_password_tag('password_confirm');
input_tag
Returns an XHTML compliant input tag with type = “text”. Its syntax is as follows −
echo input_tag('name');
label
Returns a label tag with the specified parameter.
radiobutton
Returns an XHTML compliant input tag with type = “radio”. Its syntax is as follows −
echo ' Yes '.radiobutton_tag(‘true’, 1);
echo ' No '.radiobutton_tag(‘false’, 0);
reset_tag
Returns an XHTML compliant input tag with type = “reset”. Its syntax is as follows −
echo reset_tag('Start Over');
select
Returns a select tag populated with all the countries in the world. Its syntax is as follows −
echo select_tag(
   'url', options_for_select($url_list),
   array('onChange' => 'Javascript:this.form.submit();'));
submit
Returns an XHTML compliant input tag with type = “submit”. Its syntax is as follows −
echo submit_tag('Update Record');
In the next section, we will learn how to create a form using form fields.
Student Form Application
Let’s create a simple Student details form using Symfony Form fields. To do this, we should adhere to the following steps −
Step 1: Create a Symfony Application
Create a Symfony application, formsample, using the following command.
symfony new formsample
Entities are usually created under the “src/AppBundle/Entity/“ directory.
Step 2: Create an Entity
Create the file “StudentForm.php” under the “src/AppBundle/Entity/” directory. Add the following changes in the file.
StudentForm.php
<?php
namespace AppBundle\Entity;

class StudentForm {
   private $studentName;
   private $studentId;
   public $password;
   private $address;
   public $joined;
   public $gender;
   private $email;
   private $marks;
   public $sports;

   public function getStudentName() {
      return $this->studentName;
   }
   public function setStudentName($studentName) {
      $this->studentName = $studentName;
   }
   public function getStudentId() {
      return $this->studentId;
   }
   public function setStudentId($studentid) {
      $this->studentid = $studentid;
   }
   public function getAddress() {
      return $this->address;
   }
   public function setAddress($address) {
      $this->address = $address;
   }
   public function getEmail() {
      return $this->email;
   }
   public function setEmail($email) {
      $this->email = $email;
   }
   public function getMarks() {
      return $this->marks;
   }
   public function setMarks($marks) {
      $this->marks = $marks;
   }
}
Step 3: Add a StudentController
Move to the directory “src/AppBundle/Controller”, create “StudentController.php” file, and add the following code in it.
StudentController.php
<?php
namespace AppBundle\Controller;

use AppBundle\Entity\StudentForm;
use AppBundle\Form\FormValidationType;

use Symfony\Bundle\FrameworkBundle\Controller\Controller;
use Symfony\Component\HttpFoundation\Request;
use Sensio\Bundle\FrameworkExtraBundle\Configuration\Route;

use Symfony\Component\HttpFoundation\Response;
use Symfony\Component\Form\Extension\Core\Type\TextType;
use Symfony\Component\Form\Extension\Core\Type\DateType;
use Symfony\Component\Form\Extension\Core\Type\SubmitType;
use Symfony\Component\Form\Extension\Core\Type\ChoiceType;
use Symfony\Component\Form\Extension\Core\Type\PasswordType;
use Symfony\Component\Form\Extension\Core\Type\RangeType;
use Symfony\Component\Form\Extension\Core\Type\EmailType;
use Symfony\Component\Form\Extension\Core\Type\CheckboxType;
use Symfony\Component\Form\Extension\Core\Type\ButtonType;
use Symfony\Component\Form\Extension\Core\Type\TextareaType;
use Symfony\Component\Form\Extension\Core\Type\PercentType;
use Symfony\Component\Form\Extension\Core\Type\RepeatedType;

class StudentController extends Controller {
   /**
      * @Route("/student/new")
   */
   public function newAction(Request $request) {
      $stud = new StudentForm();
      $form = $this->createFormBuilder($stud)
         ->add('studentName', TextType::class)
         ->add('studentId', TextType::class)
         ->add('password', RepeatedType::class, array(
            'type' => PasswordType::class,
            'invalid_message' => 'The password fields
            must match.', 'options' => array('attr' => array('class' => 'password-field')),
            'required' => true, 'first_options'  => array('label' => 'Password'),
            'second_options' => array('label' => 'Re-enter'),
         ))

         ->add('address', TextareaType::class)
         ->add('joined', DateType::class, array(
               'widget' => 'choice',
         ))

         ->add('gender', ChoiceType::class, array(
            'choices'  => array(
               'Male' => true,
               'Female' => false,
            ),
         ))

         ->add('email', EmailType::class)
         ->add('marks', PercentType::class)
         ->add('sports', CheckboxType::class, array(
            'label'    => 'Are you interested in sports?', 'required' => false,
         ))

         ->add('save', SubmitType::class, array('label' => 'Submit'))
         ->getForm();
         return $this->render('student/new.html.twig', array(
            'form' => $form->createView(),
         ));
   }
}
Step 4: Render the View
Move to the directory “app/Resources/views/student/“, create “new.html.twig” file and add the following changes in it.
{% extends 'base.html.twig' %}
{% block stylesheets %}
<style>
   #simpleform {
      width:600px;
      border:2px solid grey;
      padding:14px;
   }
   #simpleform label {
      font-size:14px;
      float:left;
      width:300px;
      text-align:right;
      display:block;
   }
   #simpleform span {
      font-size:11px;
      color:grey;
      width:100px;
      text-align:right;
      display:block;
   }
   #simpleform input {
      border:1px solid grey;
      font-family:verdana;
      font-size:14px;
      color:light blue;
      height:24px;
      width:250px;
      margin: 0 0 10px 10px;
   }
   #simpleform textarea {
      border:1px solid grey;
      font-family:verdana;
      font-size:14px;
      color:light blue;
      height:120px;
      width:250px;
      margin: 0 0 20px 10px;
   }
   #simpleform select {
      margin: 0 0 20px 10px;
   }
   #simpleform button {
      clear:both;
      margin-left:250px;
      background: grey;
      color:#FFFFFF;
      border:solid 1px #666666;
      font-size:16px;
   }
</style>

{% endblock %}
   {% block body %}
   <h3>Student details:</h3>
   <div id="simpleform">
      {{ form_start(form) }}
      {{ form_widget(form) }}
      {{ form_end(form) }}
   </div>
{% endblock %}
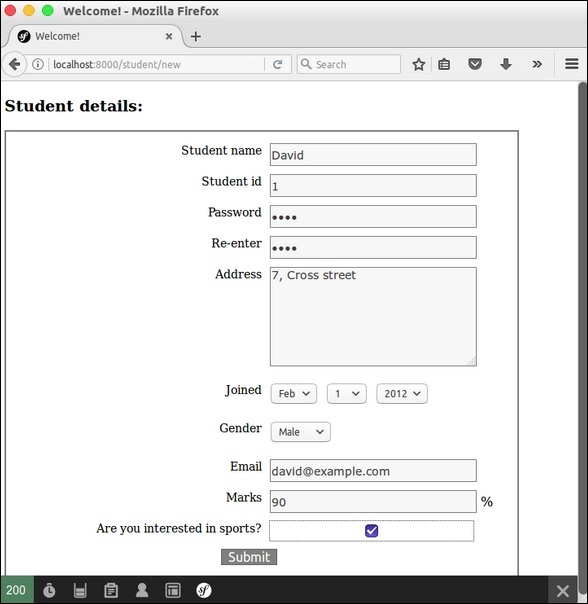
Now request the url, “http://localhost:8000/student/new” and it produces the following result.
Result


No comments:
Post a Comment