Prerequisites
- Microsoft Azure Subscription (MSDN subscribers or sign up for one month free trial).
- Visual Studio 2013 or Visual Studio 2015. To download Web installer or ISO file, please Click Here.
- Windows PowerShell. To download PowerShell Click here.
- About PowerShell commands Regarding Azure Web app.
- How to create Publish Visual Studio Solution as a File System.
- How to publish local zip file to Azure Web app.
To learn about how to Configure Azure subscription to PowerShell & how to create, check availability of the name, delete & run Web app on Microsoft Azure, please refer to:
Deploying an Azure Web app
Step 1
Create an Azure Web app, using PowerShell.
Create an Azure Web app, using PowerShell.
New-AzureWebsite -Location "South India" -Name "azurewebapppsdemo"

Note
Wait for a few seconds to create a Web app.
Wait for a few seconds to create a Web app.
Step 2
Start Visual Studio & create a New Project.

Start Visual Studio & create a New Project.

Step 3
Choose “Empty” ASP.NET Template & click OK button.
Choose “Empty” ASP.NET Template & click OK button.

Step 4
Right click on the Project Name -> Add -> New Item.

Right click on the Project Name -> Add -> New Item.

Step 5
Add HTML page file & name it as index.html.

Add HTML page file & name it as index.html.

Note
You can also add Web form or any other page.
You can also add Web form or any other page.
Step 6
Add some text into index.html file.
Add some text into index.html file.
- <!DOCTYPE html>
- <html>
- <head>
- <title></title>
- <meta charset="utf-8" />
- </head>
- <body>
- <h1>Azure Web App PowerShell Demo</h1>
- </body>
- </html>

Step 7
Now, right-click on the project name & click Publish option.

Step 8
The different options are available as a publish target but we are selecting Custom option.

The different options are available as a publish target but we are selecting Custom option.

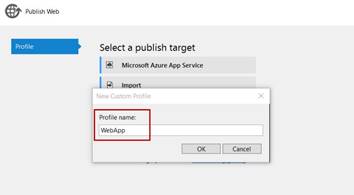
Enter Profile name. Ex. WebApp.


Change Publish method to File System. Also, set Target location.


Create new folder to publish the project.


Click Next button.
Configuration: Release.
Check Delete all the existing files prior to publish option.


Click Publish button.


Wait for a few seconds to publish the project.


Step 9
Run PowerShell & enter the command given below to build the project.
Run PowerShell & enter the command given below to build the project.
msbuild E:\Azure\webapp01\WebApplication1\WebApplication1.sln /p:DeployOnBuild=true /p:PublishProfile=WebApp /p:VisualStudioVersion=14.0


Note
Enter the solution path with an extension like .sln,
Enter the solution path with an extension like .sln,
- DeployOnBuild=true -> Deploy on Build.
- PublishProfile=WebApp -> Enter publish profile name.
- VisualStudioVersion=14.0 -> This project is developed, using Visual Studio 2015, so enter Visual Studio version.

If “Build Succeeded”, go to next step, else please check for the error.


Step 10
Now, we will upload or publish the local folder to Cloud.
Now, we will upload or publish the local folder to Cloud.
$source = "E:\Azure\webapppublish"


Note
Project published folder path as a source.
Project published folder path as a source.
$destination = "E:\Azure\webapppublish.zip"


Note
Enter new .zip file name as a destination.
Enter new .zip file name as a destination.
Add-Type -assembly "system.io.compression.filesystem"
[io.compression.zipfile]::CreateFromDirectory($source,$destination)


Note
Create a new directory, using the command
Create a new directory, using the command
Now you have .zip file or website package file to publish as AzureWebApp
Publish-AzureWebsiteProject -Package E:\Azure\webapppublish.zip -Name azurewebapppsdemo


Step 11
Website content successfully deployed on Ccloud. Now, run AzureWebApp
Website content successfully deployed on Ccloud. Now, run AzureWebApp
Show-AzureWebsite -Name azurewebapppsdemo


Automatically, the Browser will open Azure Web app.


No comments:
Post a Comment