Before you begin
Download and install the newest version of SQL Server Management Studio (SSMS).
Sign in to the Azure portal
Sign in to the Azure portal.
Create a data warehouse
An Azure SQL data warehouse is created with a defined set of compute resources. The database is created within an Azure resource group and in an Azure SQL logical server.
Follow these steps to create a SQL data warehouse that contains the AdventureWorksDW sample data.
- Click Create a resource in the upper left-hand corner of the Azure portal.
- Select Databases from the New page, and select SQL Data Warehouse under Featured on the New page.

- Fill out the SQL Data Warehouse form with the following information:

- Click Server to create and configure a new server for your new database. Fill out the New server form with the following information:

- Click Select.
- Click Performance level to specify the performance configuration for the data warehouse.
- For this tutorial, select Gen2. The slider, by default, is set to DW1000c. Try moving it up and down to see how it works.

- Click Apply.
- Now that you've completed the SQL Data Warehouse form, click Create to provision the database. Provisioning takes a few minutes.

- On the toolbar, click Notifications to monitor the deployment process.

Create a server-level firewall rule
The SQL Data Warehouse service creates a firewall at the server-level. This firewall prevents external applications and tools from connecting to the server or any databases on the server. To enable connectivity, you can add firewall rules that enable connectivity for specific IP addresses. Follow these steps to create a server-level firewall rule for your client's IP address.
Note:-
SQL Data Warehouse communicates over port 1433. If you are trying to connect from within a corporate network, outbound traffic over port 1433 might not be allowed by your network's firewall. If so, you cannot connect to your Azure SQL Database server unless your IT department opens port 1433.
- After the deployment completes, select All services from the left-hand menu. Select Databases, select the star next to SQL data warehouses to add SQL data warehouses to your favorites.
- Select SQL data warehouses from the left-hand menu and then click mySampleDatabase on the SQL data warehouses page. The overview page for your database opens, showing you the fully qualified server name (such as mynewserver-20180430.database.windows.net) and provides options for further configuration.
- Copy this fully qualified server name for use to connect to your server and its databases in this and other quick starts. To open server settings, click the server name.

- Click Show firewall settings.

- The Firewall settings page for the SQL Database server opens.

- To add your current IP address to a new firewall rule, click Add client IP on the toolbar. A firewall rule can open port 1433 for a single IP address or a range of IP addresses.
- Click Save. A server-level firewall rule is created for your current IP address opening port 1433 on the logical server.
- Click OK and then close the Firewall settings page.
You can now connect to the SQL server and its data warehouses using this IP address. The connection works from SQL Server Management Studio or another tool of your choice. When you connect, use the ServerAdmin account you created previously.
Important
By default, access through the SQL Database firewall is enabled for all Azure services. Click OFF on this page and then click Save to disable the firewall for all Azure services.
Get the fully qualified server name
Get the fully qualified server name for your SQL server in the Azure portal. Later you use the fully qualified name when connecting to the server.
- Sign in to the Azure portal.
- Select SQL Data warehouses from the left-hand menu, and click your data warehouse on the SQL data warehouses page.
- In the Essentials pane in the Azure portal page for your database, locate and then copy the Server name. In this example, the fully qualified name is mynewserver-20180430.database.windows.net.
Connect to the server as server admin
- Open SQL Server Management Studio.
- In the Connect to Server dialog box, enter the following information:

- Click Connect. The Object Explorer window opens in SSMS.
- In Object Explorer, expand Databases. Then expand mySampleDatabase to view the objects in your new database.

Run some queries
SQL Data Warehouse uses T-SQL as the query language. To open a query window and run some T-SQL queries, use the following steps:
- Right-click mySampleDataWarehouse and select New Query. A new query window opens.
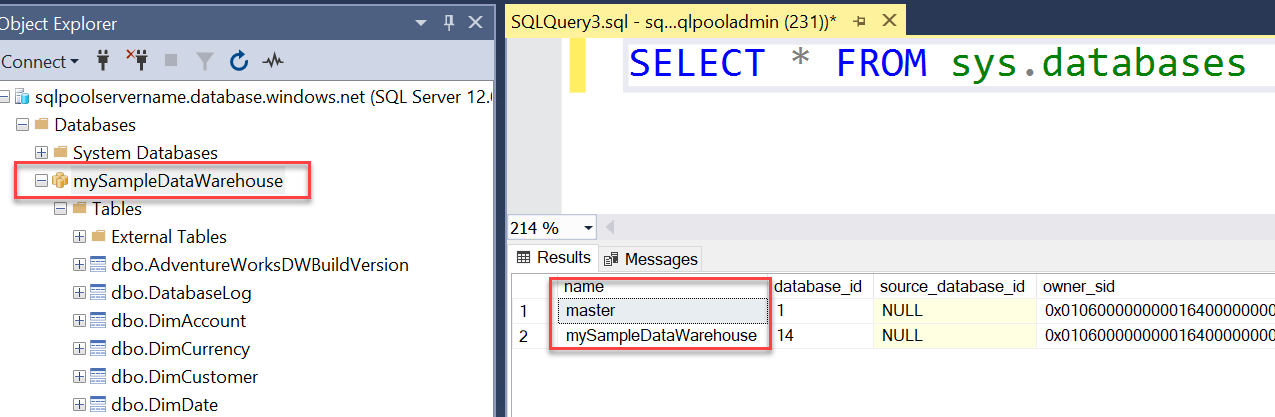
- In the query window, enter the following command to see a list of databases.SQL
SELECT * FROM sys.databases - Click Execute. The query results show two databases: master and mySampleDataWarehouse.
- To look at some data, use the following command to see the number of customers with last name of Adams that have three children at home. The results list six customers.SQL
SELECT LastName, FirstName FROM dbo.dimCustomer
WHERE LastName = 'Adams' AND NumberChildrenAtHome = 3;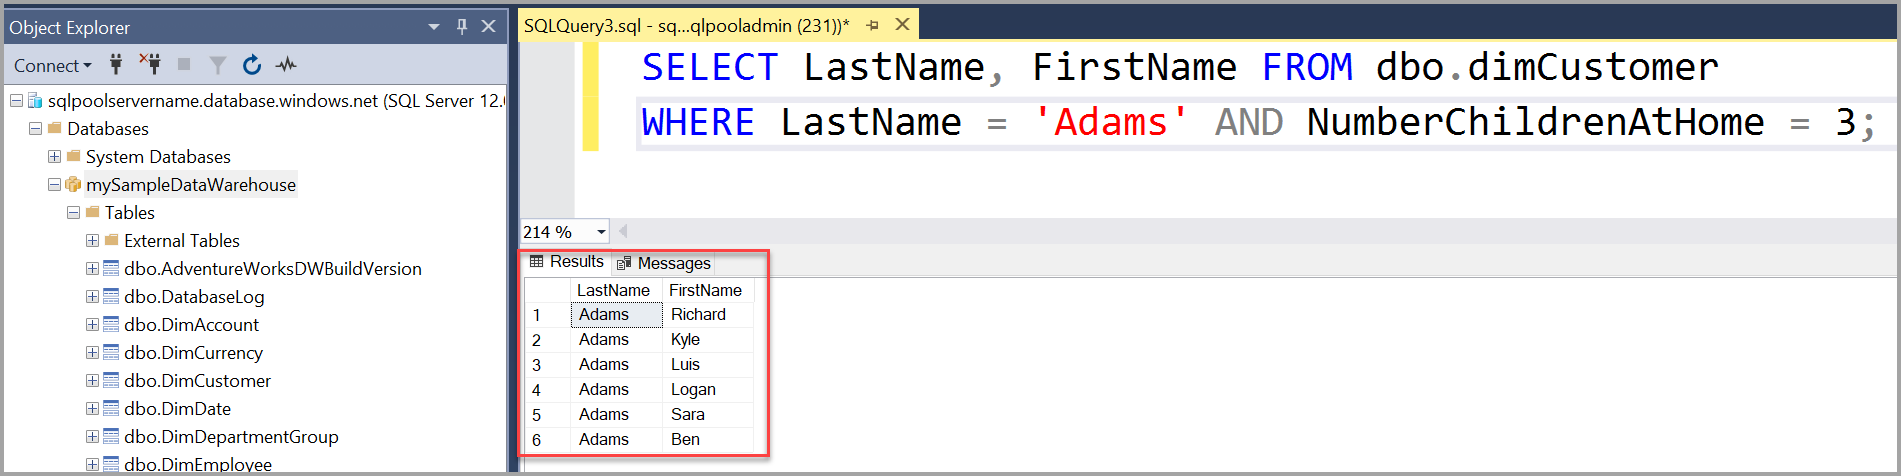
Clean up resources
You're being charged for data warehouse units and data stored your data warehouse. These compute and storage resources are billed separately.
- If you want to keep the data in storage, you can pause compute when you aren't using the data warehouse. By pausing compute, you're only charged for data storage. You can resume compute whenever you're ready to work with the data.
- If you want to remove future charges, you can delete the data warehouse.
Follow these steps to clean up resources you no longer need.
- Sign in to the Azure portal, click on your data warehouse.
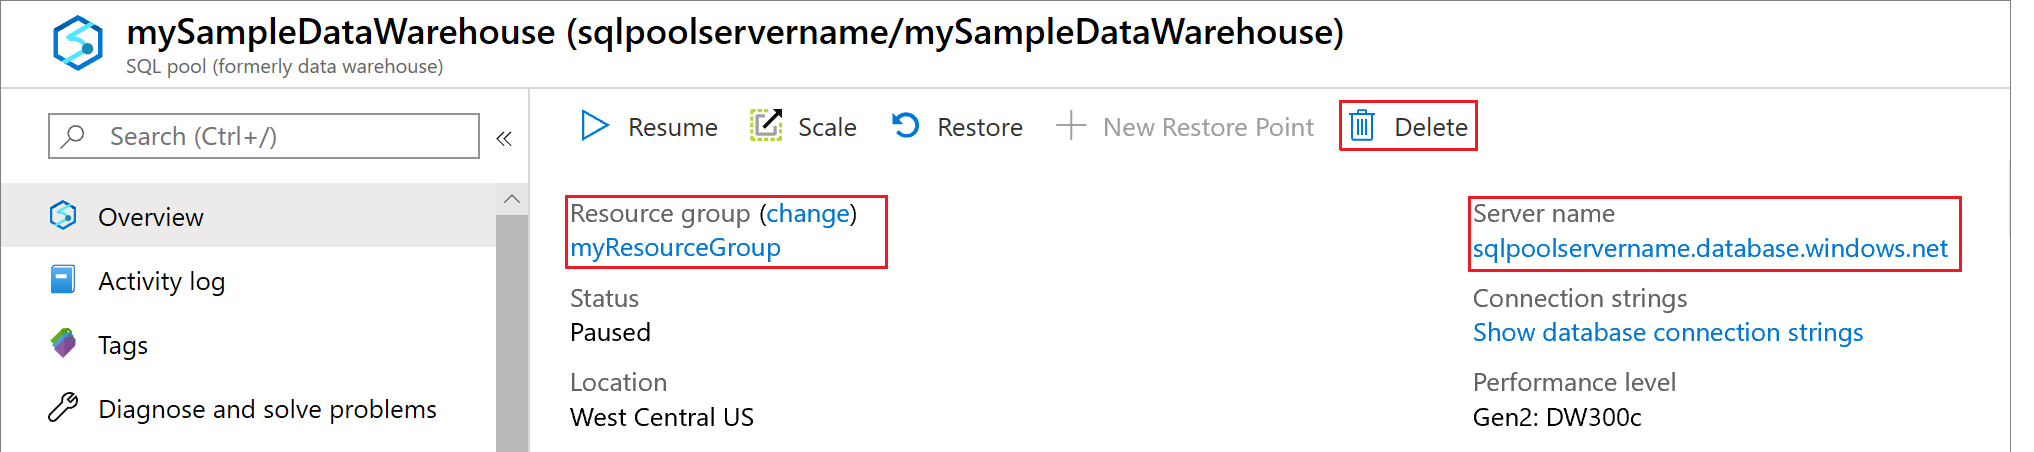
- To pause compute, click the Pause button. When the data warehouse is paused, you see a Resume button. To resume compute, click Resume.
- To remove the data warehouse so you aren't charged for compute or storage, click Delete.
- To remove the SQL server you created, click mynewserver-20180430.database.windows.net in the previous image, and then click Delete. Be careful with this deletion, since deleting the server also deletes all databases assigned to the server.
- To remove the resource group, click myResourceGroup, and then click Delete resource group.


No comments:
Post a Comment