Resource Manager templates are JSON files that define the resources you need to deploy for your solution. To understand the concepts associated with deploying and managing your Azure solutions, see Azure Resource Manager overview.

After completing the tutorial, you deploy an Azure Storage account. The same process can be used to deploy other Azure resources.
If you don't have an Azure subscription, create a free account before you begin.
Generate a template using the portal
Creating a Resource Manager template from scratch is not an easy task, especially if you are new to Azure deployment and you are not familiar with the JSON format. Using the Azure portal, you can configure a resource, for example an Azure Storage account. Before you deploy the resource, you can export your configuration into a Resource Manager template. You can save the template and reuse it in the future.
Many experienced template developers use this method to generate templates when they try to deploy Azure resources that they are not familiar with. For more information about exporting templates by using the portal, see Export resource groups to templates. The other way to find a working template is from Azure Quickstart templates.
- Sign in to the Azure portal.
- Select Create a resource > Storage > Storage account - blob, file, table, queue.

- Enter the following information:You can use the default values for the rest of the properties.
 NoteSome of the exported templates require some edits before you can deploy them.
 - Select Review + create on the bottom of the screen. Do not select Create in the next step.
- Select Download a template for automation on the bottom of the screen. The portal shows the generated template:
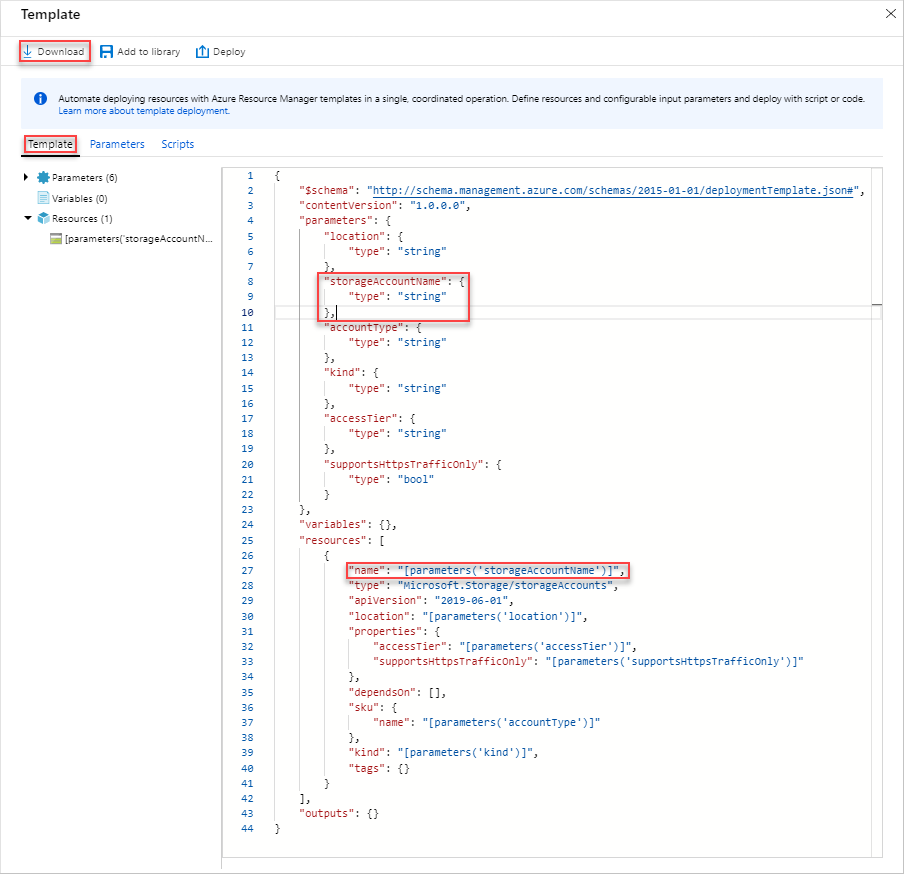 The main pane shows the template. It is a JSON file with six top-level elements -
schema,contentVersion,parameters,variables,resources, andoutput. For more information, see Understand the structure and syntax of Azure Resource Manager TemplatesThere are six parameters defined. One of them is called storageAccountName. The second highlighted part on the previous screenshot shows how to reference this parameter in the template. In the next section, you edit the template to use a generated name for the storage account.In the template, one Azure resource is defined. The type isMicrosoft.Storage/storageAccounts. Take a look of how the resource is defined, and the definition structure. - Select Download from the top of the screen.
- Open the downloaded zip file, and then save template.json to your computer. In the next section, you use a template deployment tool to edit the template.
- Select the Parameter tab to see the values you provided for the parameters. Write down these values, you need them in the next section when you deploy the template.
 Using both the template file and the parameters file, you can create a resource, in this tutorial, an Azure storage account.
Edit and deploy the template
The Azure portal can be used to perform some basic template editing. In this quickstart, you use a portal tool called Template Deployment. Template Deployment is used in this tutorial so you can complete the whole tutorial using one interface - the Azure portal. To edit a more complex template, consider using Visual Studio Code, which provides richer edit functionalities.
Important
Template Deployment provides an interface for testing simple templates. It is not recommended to use this feature in production. Instead, store your templates in an Azure storage account, or a source code repository like GitHub.
Azure requires that each Azure service has a unique name. The deployment could fail if you entered a storage account name that already exists. To avoid this issue, you modify the template to use a template function call
uniquestring() to generate a unique storage account name.- In the Azure portal, select Create a resource.
- In Search the Marketplace, type template deployment, and then press ENTER.
- Select Template deployment.

- Select Create.
- Select Build your own template in the editor.
- Select Load file, and then follow the instructions to load template.json you downloaded in the last section.
- Make the following three changes to the template:

- Remove the storageAccountName parameter as shown in the previous screenshot.
- Add one variable called storageAccountName as shown in the previous screenshot:JSON
"storageAccountName": "[concat(uniqueString(subscription().subscriptionId), 'storage')]"Two template functions are used here:concat()anduniqueString(). - Update the name element of the Microsoft.Storage/storageAccounts resource to use the newly defined variable instead of the parameter:JSON
"name": "[variables('storageAccountName')]",The final template shall look like:JSON{ "$schema": "https://schema.management.azure.com/schemas/2015-01-01/deploymentTemplate.json#", "contentVersion": "1.0.0.0", "parameters": { "location": { "type": "string" }, "accountType": { "type": "string" }, "kind": { "type": "string" }, "accessTier": { "type": "string" }, "supportsHttpsTrafficOnly": { "type": "bool" } }, "variables": { "storageAccountName": "[concat(uniqueString(subscription().subscriptionId), 'storage')]" }, "resources": [ { "name": "[variables('storageAccountName')]", "type": "Microsoft.Storage/storageAccounts", "apiVersion": "2018-07-01", "location": "[parameters('location')]", "properties": { "accessTier": "[parameters('accessTier')]", "supportsHttpsTrafficOnly": "[parameters('supportsHttpsTrafficOnly')]" }, "dependsOn": [], "sku": { "name": "[parameters('accountType')]" }, "kind": "[parameters('kind')]" } ], "outputs": {} }
- Select Save.
- Enter the following values:Here is a screenshot of a sample deployment:

- Select Purchase.
- Select the bell icon (notifications) from the top of the screen to see the deployment status. You shall see Deployment in progress. Wait until the deployment is completed.

- Select Go to resource group from the notification pane. You shall see a screen similar to:
 You can see the deployment status was successful, and there is only one storage account in the resource group. The storage account name is a unique string generated by the template. To learn more about using Azure storage accounts, see Quickstart: Upload, download, and list blobs using the Azure portal.
Clean up resources
When the Azure resources are no longer needed, clean up the resources you deployed by deleting the resource group.
- In the Azure portal, select Resource group on the left menu.
- Enter the resource group name in the Filter by name field.
- Select the resource group name. You shall see the storage account in the resource group.
- Select Delete resource group in the top menu.

No comments:
Post a Comment