In our previous blog "Integrate Salesforce with C# or ASP.NET MVC Application", we have shown how you can set up a project for Salesforce integration.
Now, in this blog we are going to perform CRUD operations with Salesforce. To perform CRUD operations, we need to create new Custom Object in Salesforce. In this blog, we are going to create Phonebook custom object.
Create Custom Object
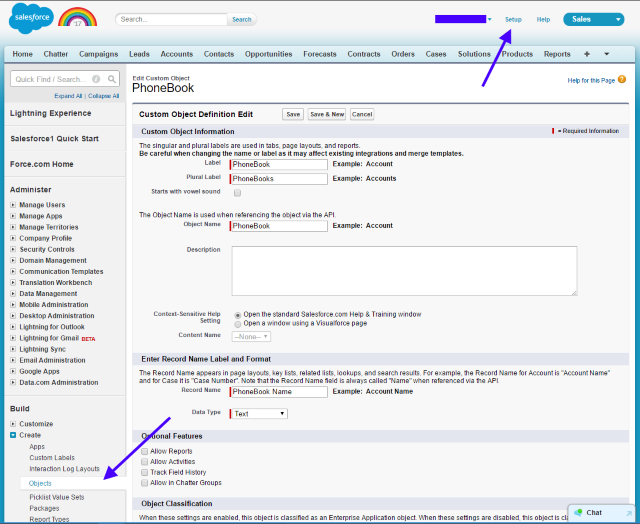
In top-right corner of main navigation header, you will see "Setup" link and click on it > on left side navigation menu click on "Create" link under "Build" section > under expanded sub-menu, click on "Objects" link > click on "New Custom Object" button shown in main content area > Enter data as given in screenshot below > click on "Save" button.

Figure 1: Salesforce - Create Custom Object
Now you have successfully created a Phonebook object.

Figure 2: Salesforce - Custom Objects list
Create Attributes or Fields
Next, we have to define attribute for this "Phonebook" custom object. Under Build > Create > Objects > from Custom Object page, click on custom object name.

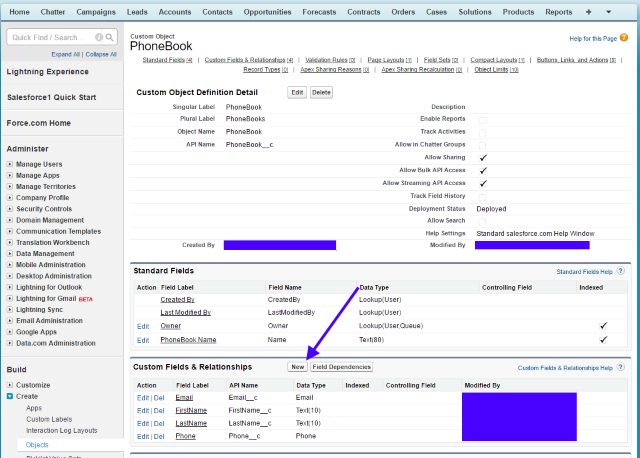
Figure 3: Salesforce - Custom Fields and Relationships
It will open the details view for "Phonebook" custom object. Under "Custom Fields & Relationships" section, click on "New" button > Select Data Type of object > Click on Next > Fill appropriate data and click on "Save" button.
We have created four fields such as Email, First Name, Last Name and Phone for PhoneBook custom object.
Now let's start with coding :)
After successful authentication with Salesforce as we have seen in previous blog, we have to create same object in our code.You can access Salesforce object and its attribute by its API name.
1 2 3 4 5 6 7 8 | public class PhoneBook{ public const String SObjectTypeName = "PhoneBook__c"; public string Email__c { get; set; } public string FirstName__c { get; set; } public string LastName__c { get; set; } public long Phone__c { get; set; }} |
Create
1 2 3 4 5 6 7 8 9 10 11 | // InitializationPhoneBook phoneBook = new PhoneBook();// Create Queryvar addPhoneData = new PhoneBook { Email__c = "john@gmail.com", FirstName__c = "John", LastName__c = "Doe", Phone__c = 9876543210 };var result = await client.CreateAsync(PhoneBook.SObjectTypeName, addPhoneData);if (result.Id == null){ Console.WriteLine("Cannot insert data to Phonebook!"); return;}Console.WriteLine("Successfully added the record."); |
Update
1 2 3 4 5 6 7 8 | // Update Queryvar success = await client.UpdateAsync(PhoneBook.SObjectTypeName, result.Id, new { FirstName__c = "Tim" });if (!string.IsNullOrEmpty(success.Errors.ToString())){ Console.WriteLine("Failed to update test record!"); return;}Console.WriteLine("Successfully updated the record."); |
Delete
1 2 3 4 5 6 7 8 9 | // Delete QueryConsole.WriteLine("Deleting the record by ID.");var deleted = await client.DeleteAsync(PhoneBook.SObjectTypeName, result.Id);if (!deleted){ Console.WriteLine("Failed to delete the record by ID!"); return;}Console.WriteLine("Successfully deleted the record."); |
How to check Salesforce Operations?
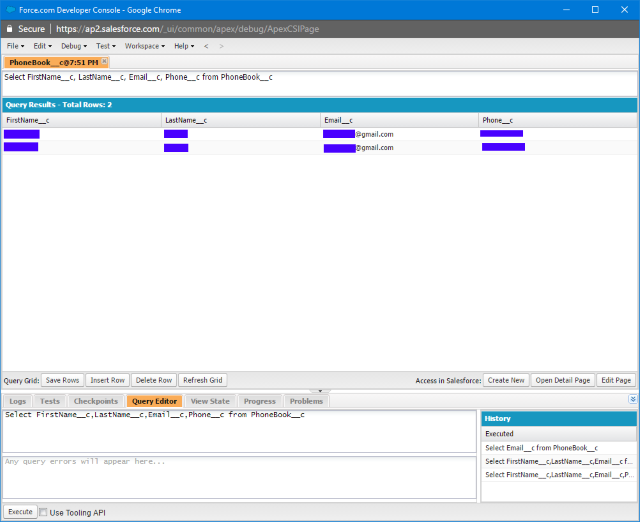
Salesforce provide "Developer Console" which allows you to execute SQL like queries to verify the data inserted into custom objects. You can execute below given query using these steps: Click on your name given in top-right corner in main navigation header > click on Developer Console > it will open a popup for "Force.com Developer Console" > under Query Editor tab > Execute command given below in Query Editor > click on Execute button.
1 | Select FirstName__c, LastName__c, Email__c, Phone__c from PhoneBook__c |

Figure 4: Salesforce - Developer Console
Why we need Salesforce Integration?
We can perform Salesforce integration for any application which requires CRM feature. We have integrated Salesforce with RainWorx AuctionWorx project.
"AuctionWorx Enterprise is a complete auction website solution. List your own products or create a marketplace with multiple vendors. It can be configured and ready to deploy as-is or customized to suit your business needs. AuctionWorx Enterprise includes Auctions, Fixed Price, and Classified listings. All listing formats can be turned on/off and configured through the web-based Admin Control Panel." - refer this link to know more about AuctionWorx.
We have performed Salesforce Integration on following actions:
1. When new user registers successfully on AuctionWorx website.
2. When a user wins the bid on Auction listing then this winner’s information gets saved in Salesforce so that customer support team can coordinate further to close the purchase process.
3. When a user changes his/her profile details then we can call Salesforce API to update the details in Salesforce.

No comments:
Post a Comment