Microsoft Azure user interface
Given the dynamic nature of Microsoft cloud tools, you might experience Azure UI changes that occur after the development of this training content. As a result, the lab instructions and lab steps might not align correctly.
Microsoft updates this training course when the community alerts us to needed changes. However, cloud updates occur frequently, so you might encounter UI changes before this training content updates. If this occurs, adapt to the changes, and then work through them in the labs as needed.
Instructions
Before you start
Sign in to the lab environment
Sign in to your Windows 10 virtual machine (VM) by using the following credentials:
- Username: Admin
- Password: Pa55w.rd
Note: Your instructor will provide instructions to connect to the virtual lab environment.
Review the installed applications
Find the taskbar on your Windows 10 desktop. The taskbar contains the icons for the applications that you’ll use in this lab, including:
- Microsoft Edge
- File Explorer
- Windows Terminal
- Visual Studio Code
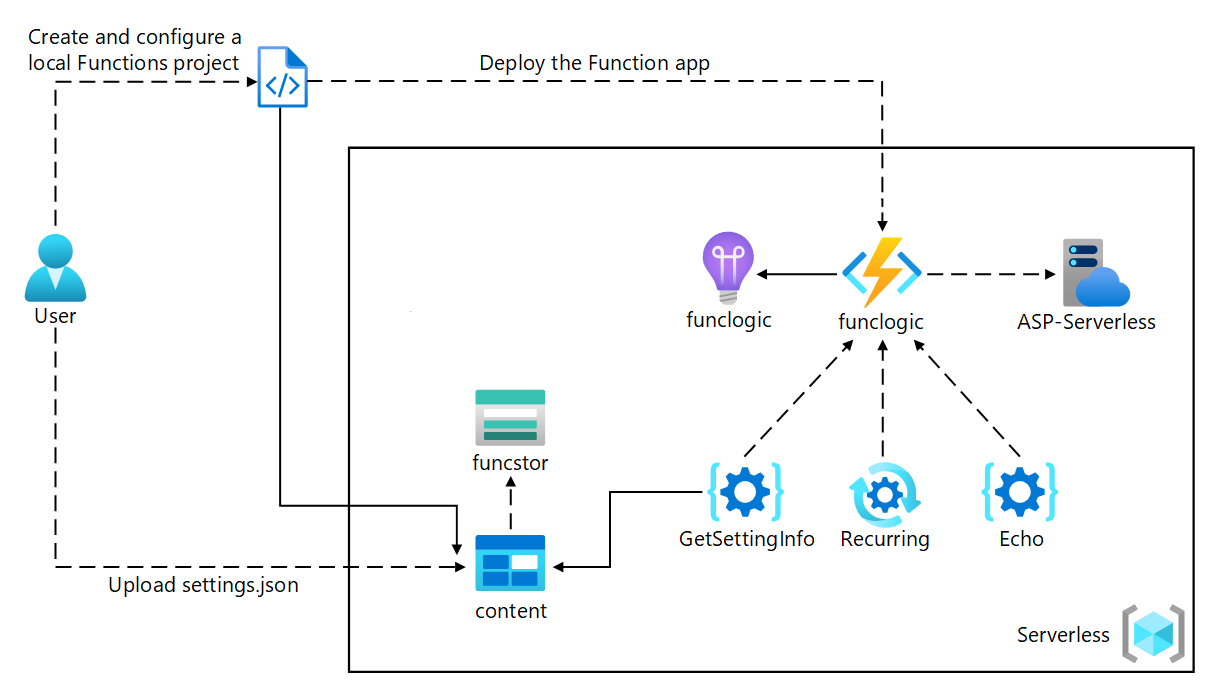
Architecture diagram
Exercise 1: Create Azure resources
Task 1: Open the Azure portal
- On the taskbar, select the Microsoft Edge icon.
In the browser window, browse to the Azure portal (https://portal.azure.com), and then sign in with the account you’ll be using for this lab.
Note: If this is your first time signing in to the Azure portal, you’ll be offered a tour of the portal. If you prefer to skip the tour, select Get Started to begin using the portal.
Task 2: Create an Azure Storage account
In the Azure portal, use the Search resources, services, and docs text box to search for Storage Accounts, and then, in the list of results, select Storage Accounts.
On the Storage accounts blade, select + Create.
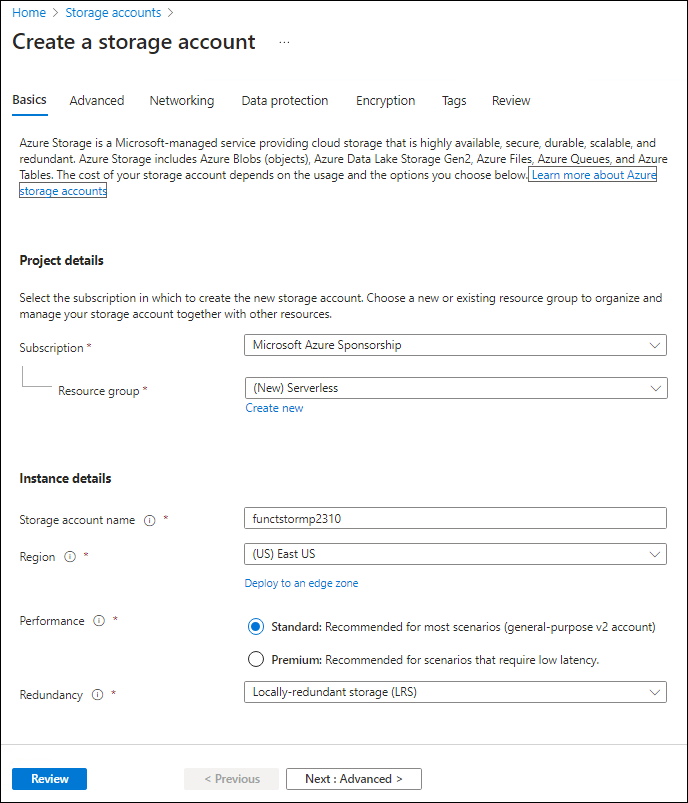
On the Create a storage account blade, on the Basics tab, perform the following actions, and then select Review:
Setting Action Subscription drop-down list Retain the default value Resource group section Select Create new, enter Serverless, and then select OK Storage account name text box Enter funcstor[yourname] Region drop-down list Select (US) East US Performance section Select the Standard option Redundancy drop-down list Select Locally-redundant storage (LRS) The following screenshot displays the configured settings in the Create a storage account blade.
On the Review tab, review the options that you selected during the previous steps.
Select Create to create the storage account by using your specified configuration.
Note: Wait for the creation task to complete before you proceed with this lab.
On the Overview blade, select the Go to resource button to navigate to the blade of the newly created storage account.
On the Storage account blade, in the Security + networking section, select Access keys.
On the Access keys blade, select Show keys.
Review any one of the keys, and then copy the value of either of the Connection string boxes to the clipboard.
Note: It doesn’t matter which connection string you choose. They are interchangeable.
Open Notepad, and then paste the copied connection string value to Notepad. You’ll use this value later in this lab.
Task 3: Create a function app
On the Azure portal’s navigation pane, select the Create a resource link.
On the Create a resource blade, in the Search services and marketplace text box, enter Function, and then select Enter.
On the Marketplace search results blade, select the Function App result.
On the Function App blade, select Create.
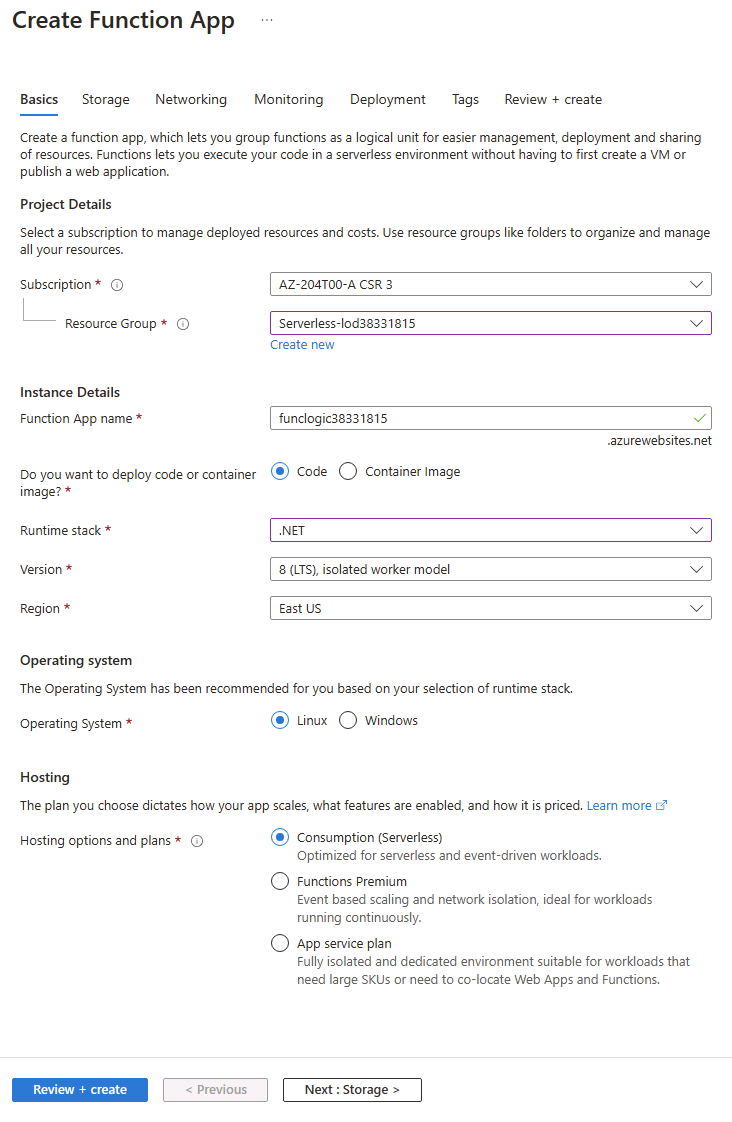
On the Create Function App blade, on the Basics tab, perform the following actions, and then select Next: Hosting:
Setting Action Subscription drop-down list Retain the default value Resource group section Select Serverless Function App name text box Enter funclogic[yourname] Publish section Select Code Runtime stack drop-down list Select .NET Version drop-down list Select 6 Region drop-down list Select the East US region Operating System option Select Linux Plan type drop-down list Select Consumption (Serverless) The following screenshot displays the configured settings in the Create Function App blade.
On the Hosting tab, perform the following actions, and then select Review + create:
Setting Action Storage account drop-down list Select the funcstor[yourname] storage account On the Review + create tab, review the options that you selected during the previous steps.
Select Create to create the function app by using your specified configuration.
Note: Wait for the creation task to complete before you move forward with this lab.
Review
In this exercise, you created all the resources that you’ll use in this lab.
Exercise 2: Configure a local Azure Functions project
Task 1: Initialize a function project
On the taskbar, select the Windows Terminal icon.
Run the following command to change the current directory to the Allfiles (F):\Allfiles\Labs\02\Starter\func empty directory:
Codecd F:\Allfiles\Labs\02\Starter\funcNote: In Windows Explorer remove the Read-only attribute from F:\Allfiles\Labs\02\Starter\func\.gitignore file.
Run the following command to use the Azure Functions Core Tools to create a new local Azure Functions project in the current directory using the dotnet runtime:
Codefunc init --worker-runtime dotnet --forceNote: You can review the documentation to [create a new project][azure-functions-core-tools-new-project] using the Azure Functions Core Tools.
Close the Windows Terminal application.
Task 2: Configure a connection string
- On the Start screen, select the Visual Studio Code tile.
- On the File menu, select Open Folder.
- In the File Explorer window that opens, browse to Allfiles (F):\Allfiles\Labs\02\Starter\func, and then select Select Folder.
- On the Explorer pane of the Visual Studio Code window, open the local.settings.json file.
Observe the current value of the AzureWebJobsStorage setting:
Code"AzureWebJobsStorage": "UseDevelopmentStorage=true",- Change the value of the AzureWebJobsStorage element to the connection string of the storage account that you recorded earlier in this lab.
- Save the local.settings.json file.
Task 3: Build and validate a project
- On the taskbar, select the Windows Terminal icon.
Run the following command to change the current directory to the Allfiles (F):\Allfiles\Labs\02\Starter\func directory:
Codecd F:\Allfiles\Labs\02\Starter\funcRun the following command to build the .NET Core 3.1 project:
Codedotnet build
Review
In this exercise, you created a local project that you’ll use for Azure Functions development.
Exercise 3: Create a function that’s triggered by an HTTP request
Task 1: Create an HTTP-triggered function
- On the taskbar, select the Windows Terminal icon.
Run the following command to change the current directory to the Allfiles (F):\Allfiles\Labs\02\Starter\func directory:
Codecd F:\Allfiles\Labs\02\Starter\funcRun the following command to use the Azure Functions Core Tools to create a new function named Echo using the HTTP trigger template:
Codefunc new --template "HTTP trigger" --name "Echo"Note: You can review the documentation to [create a new function][azure-functions-core-tools-new-function] using the Azure Functions Core Tools.
- Close the currently running Windows Terminal application.
Task 2: Write HTTP-triggered function code
- On the Start screen, select the Visual Studio Code tile.
- On the File menu, select Open Folder.
- In the File Explorer window that opens, browse to Allfiles (F):\Allfiles\Labs\02\Starter\func, and then select Select Folder.
- On the Explorer pane of the Visual Studio Code window, open the Echo.cs file.
In the code editor, observe the example implementation:
C#using System; using System.IO; using System.Threading.Tasks; using Microsoft.AspNetCore.Mvc; using Microsoft.Azure.WebJobs; using Microsoft.Azure.WebJobs.Extensions.Http; using Microsoft.AspNetCore.Http; using Microsoft.Extensions.Logging; using Newtonsoft.Json; namespace func { public static class Echo { [FunctionName("Echo")] public static async Task<IActionResult> Run( [HttpTrigger(AuthorizationLevel.Function, "get", "post", Route = null)] HttpRequest req, ILogger log) { log.LogInformation("C# HTTP trigger function processed a request."); string name = req.Query["name"]; string requestBody = await new StreamReader(req.Body).ReadToEndAsync(); dynamic data = JsonConvert.DeserializeObject(requestBody); name = name ?? data?.name; string responseMessage = string.IsNullOrEmpty(name) ? "This HTTP triggered function executed successfully. Pass a name in the query string or in the request body for a personalized response." : $"Hello, {name}. This HTTP triggered function executed successfully."; return new OkObjectResult(responseMessage); } } }- Delete all the content within the Echo.cs file.
Add the following lines of code to add using directives for the Microsoft.AspNetCore.Mvc, Microsoft.Azure.WebJobs, Microsoft.AspNetCore.Http, and Microsoft.Extensions.Logging namespaces:
C#using Microsoft.AspNetCore.Mvc; using Microsoft.Azure.WebJobs; using Microsoft.AspNetCore.Http; using Microsoft.Extensions.Logging;Create a new public static class named Echo:
C#public static class Echo { }Observe the Echo.cs file again, which should now include:
C#using Microsoft.AspNetCore.Mvc; using Microsoft.Azure.WebJobs; using Microsoft.AspNetCore.Http; using Microsoft.Extensions.Logging; public static class Echo { }Within the Echo class, add the following code block to create a new public static method named Run that returns a variable of type IActionResult and that also takes in variables of type HttpRequest and ILogger as parameters named request and logger:
C#public static IActionResult Run( HttpRequest request, ILogger logger) { }Add the following code to append an attribute to the Run method of type FunctionNameAttribute that has its name parameter set to a value of Echo:
C#[FunctionName("Echo")] public static IActionResult Run( HttpRequest request, ILogger logger) { }Add the following code to append an attribute to the request parameter of type HttpTriggerAttribute that has its methods parameter array set to a single value of POST:
C#[FunctionName("Echo")] public static IActionResult Run( [HttpTrigger("POST")] HttpRequest request, ILogger logger) { }Observe the Echo.cs file again, which should now include the following code:
C#using Microsoft.AspNetCore.Mvc; using Microsoft.Azure.WebJobs; using Microsoft.AspNetCore.Http; using Microsoft.Extensions.Logging; public static class Echo { [FunctionName("Echo")] public static IActionResult Run( [HttpTrigger("POST")] HttpRequest request, ILogger logger) { } }In the Run method, enter the following line of code to log a fixed message:
C#logger.LogInformation("Received a request");Enter the following line of code to echo the body of the HTTP request as the HTTP response:
C#return new OkObjectResult(request.Body);Observe the Echo.cs file again, which should now include the following code:
C#using Microsoft.AspNetCore.Mvc; using Microsoft.Azure.WebJobs; using Microsoft.AspNetCore.Http; using Microsoft.Extensions.Logging; public static class Echo { [FunctionName("Echo")] public static IActionResult Run( [HttpTrigger("POST")] HttpRequest request, ILogger logger) { logger.LogInformation("Received a request"); return new OkObjectResult(request.Body); } }- Select Save to save your changes to the Echo.cs file.
Task 3: Test the HTTP-triggered function by using httprepl
- On the taskbar, select the Windows Terminal icon.
Run the following command to change the current directory to the Allfiles (F):\Allfiles\Labs\02\Starter\func directory:
Codecd F:\Allfiles\Labs\02\Starter\funcRun the following command to run the function app project:
Codefunc start --buildNote: You can review the documentation to start the function app project locally using the Azure Functions Core Tools.
On the taskbar, select the Windows Terminal icon again to open a new instance of the application. Run the following command to change the current directory to the Allfiles (F):\Allfiles\Labs\02\Starter\func empty directory:
Codecd F:\Allfiles\Labs\02\Starter\funcFrom the command prompt, run the following command to install and start the httprepl tool, setting the base Uniform Resource Identifier (URI) to
http://localhost:7071:Codedotnet tool install -g Microsoft.dotnet-httprepl httprepl http://localhost:7071Note: An error message is displayed by the httprepl tool. This message occurs because the tool is searching for a Swagger definition file to use to traverse the API. Because your function project doesn’t produce a Swagger definition file, you’ll need to traverse the API manually.
From the tool’s prompt, run the following command to browse to the relative api directory:
Codecd apiRun the following command to browse to the relative echo directory:
Codecd echoRun the following command to run the post command, sending in an HTTP request body set to a numeric value of 3 by using the --content option:
Codepost --content 3Run the following command to run the post command, sending in an HTTP request body set to a numeric value of 5 by using the --content option:
Codepost --content 5Run the following command to run the post command, sending in an HTTP request body set to a string value of Hello by using the --content option:
Codepost --content "Hello"Run the following command to run the post command, sending in an HTTP request body set to a JavaScript Object Notation (JSON) value of {“msg”: “Successful”} by using the --content option:
Codepost --content "{"msg": "Successful"}"Run the following command to exit the httprepl application:
Codeexit- Close all currently running instances of the Windows Terminal application.
Review
In this exercise, you created a basic function that echoes the content sent through an HTTP POST request.
Exercise 4: Create a function that triggers on a schedule
Task 1: Create a schedule-triggered function
- On the taskbar, select the Windows Terminal icon.
Run the following command to change the current directory to the Allfiles (F):\Allfiles\Labs\02\Starter\func directory:
Codecd F:\Allfiles\Labs\02\Starter\funcFrom the command prompt, run the following command to use the Azure Functions Core Tools to create a new function named Recurring, using the Timer trigger template:
Codefunc new --template "Timer trigger" --name "Recurring"Note: You can review the documentation to [create a new function][azure-functions-core-tools-new-function] using the Azure Functions Core Tools.
- Close the currently running Windows Terminal application.
Task 2: Observe function code
- On the Start screen, select the Visual Studio Code tile.
- On the File menu, select Open Folder.
- In the File Explorer window that opens, browse to Allfiles (F):\Allfiles\Labs\02\Starter\func, and then select Select Folder.
- On the Explorer pane of the Visual Studio Code window, open the Recurring.cs file.
In the code editor, observe the implementation:
C#using System; using Microsoft.Azure.WebJobs; using Microsoft.Azure.WebJobs.Host; using Microsoft.Extensions.Logging; namespace func { public static class Recurring { [FunctionName("Recurring")] public static void Run([TimerTrigger("0 */5 * * * *")]TimerInfo myTimer, ILogger log) { log.LogInformation($"C# Timer trigger function executed at: {DateTime.Now}"); } } }
Task 3: Observe function runs
- On the taskbar, select the Windows Terminal icon.
Run the following command to change the current directory to the Allfiles (F):\Allfiles\Labs\02\Starter\func directory:
Codecd F:\Allfiles\Labs\02\Starter\funcFrom the command prompt, run the following command to run the function app project:
Codefunc start --buildNote: You can review the documentation to [start the function app project locally][azure-functions-core-tools-start-function] using the Azure Functions Core Tools.
- Observe the function run that occurs about every five minutes. Each function run should render a simple message to the log.
- Close the currently running Windows Terminal application.
Task 4: Update the function integration configuration
- On the Start screen, select the Visual Studio Code tile.
- On the File menu, select Open Folder.
- In the File Explorer window that opens, browse to Allfiles (F):\Allfiles\Labs\02\Starter\func, and then select Select Folder.
- On the Explorer pane of the Visual Studio Code window, open the Recurring.cs file.
In the code editor, observe the existing Run method signature:
C#[FunctionName("Recurring")] public void Run([TimerTrigger("0 */5 * * * *")]TimerInfo myTimer, ILogger log)Update the Run method signature code block to change the schedule to run once every 30 seconds:
C#[FunctionName("Recurring")] public void Run([TimerTrigger("*/30 * * * * *")]TimerInfo myTimer, ILogger log)- Select Save to save your changes to the Recurring.cs file.
Task 5: Observe function runs
On the taskbar, select the Windows Terminal icon.
Run the following command to change the current directory to the Allfiles (F):\Allfiles\Labs\02\ \Starter\func directory:
Codecd F:\Allfiles\Labs\02\Starter\func- From the command prompt, run the following command to run the function app project:
Codefunc start --buildNote: You can review the documentation to [start the function app project locally][azure-functions-core-tools-start-function] using the Azure Functions Core Tools.
Observe the function run that occurs about every 30 seconds. Each function run should render a simple message to the log.
Close the currently running Windows Terminal application.
- Close the Visual Studio Code window.
Review
In this exercise, you created a function that runs automatically based on a fixed schedule.
Exercise 5: Create a function that integrates with other services
Task 1: Upload sample content to Azure Blob Storage
- On the Azure portal’s navigation pane, select the Resource groups link.
- On the Resource groups blade, select the Serverless resource group that you created previously in this lab.
- On the Serverless blade, select the funcstor[yourname] storage account that you created previously in this lab.
- On the Storage account blade, select the Containers link in the Data storage section.
- In the Containers section, select + Container.
In the New container pop-up window, perform the following actions, and then select Create:
Setting Action Name text box Enter content Public access level drop-down list Select Private (no anonymous access) - Return to the Containers section, and then select the recently created content container.
- On the Container blade, select Upload.
In the Upload blob window, perform the following actions, and then select Upload:
Setting Action Files section Select the Folder icon File Explorer window Browse to Allfiles (F):\Allfiles\Labs\02\Starter, select the settings.json file, and then select Open Overwrite if files already exist check box Ensure that this check box is selected Note: Wait for the blob to upload before you continue with this lab.
Task 2: Create an HTTP-triggered function
- On the taskbar, select the Windows Terminal icon.
Run the following command to change the current directory to the Allfiles (F):\Allfiles\Labs\02\Starter\func directory:
Codecd F:\Allfiles\Labs\02\Starter\funcFrom the command prompt, run the following command to use the Azure Functions Core Tools to create a new function named GetSettingInfo, using the HTTP trigger template:
Codefunc new --template "HTTP trigger" --name "GetSettingInfo"Note: You can review the documentation to [create a new function][azure-functions-core-tools-new-function] using the Azure Functions Core Tools.
- Close the currently running Windows Terminal application.
Task 3: Write HTTP-triggered and blob-inputted function code
- On the Start screen, select the Visual Studio Code tile.
- On the File menu, select Open Folder.
- In the File Explorer window that opens, browse to Allfiles (F):\Allfiles\Labs\02\Starter\func, and then select Select Folder.
- On the Explorer pane of the Visual Studio Code window, open the GetSettingInfo.cs file.
In the code editor, observe the example implementation:
C#using System; using System.IO; using System.Threading.Tasks; using Microsoft.AspNetCore.Mvc; using Microsoft.Azure.WebJobs; using Microsoft.Azure.WebJobs.Extensions.Http; using Microsoft.AspNetCore.Http; using Microsoft.Extensions.Logging; using Newtonsoft.Json; namespace func { public static class GetSettingInfo { [FunctionName("GetSettingInfo")] public static async Task<IActionResult> Run( [HttpTrigger(AuthorizationLevel.Function, "get", "post", Route = null)] HttpRequest req, ILogger log) { log.LogInformation("C# HTTP trigger function processed a request."); string name = req.Query["name"]; string requestBody = await new StreamReader(req.Body).ReadToEndAsync(); dynamic data = JsonConvert.DeserializeObject(requestBody); name = name ?? data?.name; string responseMessage = string.IsNullOrEmpty(name) ? "This HTTP triggered function executed successfully. Pass a name in the query string or in the request body for a personalized response." : $"Hello, {name}. This HTTP triggered function executed successfully."; return new OkObjectResult(responseMessage); } } }Delete all the content within the GetSettingInfo.cs file.
Add the following lines of code to add using directives for the Microsoft.AspNetCore.Http, Microsoft.AspNetCore.Mvc, and Microsoft.Azure.WebJobs namespaces:
C#using Microsoft.AspNetCore.Http; using Microsoft.AspNetCore.Mvc; using Microsoft.Azure.WebJobs;Create a new public static class named GetSettingInfo:
C#public static class GetSettingInfo { }Observe the GetSettingInfo.cs file again, which should now include the following code:
C#using Microsoft.AspNetCore.Http; using Microsoft.AspNetCore.Mvc; using Microsoft.Azure.WebJobs; public static class GetSettingInfo { }Within the GetSettingInfo class, add the following code block to create a new public static expression-bodied method named Run that returns a variable of type IActionResult and that also takes in variables of type HttpRequest and string as parameters named request and json:
C#public static IActionResult Run( HttpRequest request, string json) => null;Note: You are only temporarily setting the return value to null.
Add the following code to append an attribute to the Run method of type FunctionNameAttribute that has its name parameter set to a value of GetSettingInfo:
C#[FunctionName("GetSettingInfo")] public static IActionResult Run( HttpRequest request, string json) => null;Add the following code to append an attribute to the request parameter of type HttpTriggerAttribute that has its methods parameter array set to a single value of GET:
C#[FunctionName("GetSettingInfo")] public static IActionResult Run( [HttpTrigger("GET")] HttpRequest request, string json) => null;Add the following code to append an attribute to the json parameter of type BlobAttribute that has its blobPath parameter set to a value of content/settings.json:
C#[FunctionName("GetSettingInfo")] public static IActionResult Run( [HttpTrigger("GET")] HttpRequest request, [Blob("content/settings.json")] string json) => null;Add the following code to update the Run expression-bodied method to return a new instance of the OkObjectResult class passing in the value of the json method parameter as the sole constructor parameter:
C#[FunctionName("GetSettingInfo")] public static IActionResult Run( [HttpTrigger("GET")] HttpRequest request, [Blob("content/settings.json")] string json) => new OkObjectResult(json);Observe the GetSettingInfo.cs file again, which should now include the following code:
C#using Microsoft.AspNetCore.Http; using Microsoft.AspNetCore.Mvc; using Microsoft.Azure.WebJobs; public static class GetSettingInfo { [FunctionName("GetSettingInfo")] public static IActionResult Run( [HttpTrigger("GET")] HttpRequest request, [Blob("content/settings.json")] string json) => new OkObjectResult(json); }- Select Save to save your changes to the GetSettingInfo.cs file.
Task 4: Register Azure Storage Blob extensions
- On the taskbar, select the Windows Terminal icon.
Run the following command to change the current directory to the Allfiles (F):\Allfiles\Labs\02\Starter\func directory:
Codecd F:\Allfiles\Labs\02\Starter\funcFrom the command prompt, run the following command to register the Microsoft.Azure.WebJobs.Extensions.Storage extension:
Codefunc extensions install --package Microsoft.Azure.WebJobs.Extensions.Storage --version 5.0.1Run the following command to build the .NET project and to validate the extensions were installed correctly:
Codedotnet build- Close all currently running instances of the Windows Terminal application.
Task 5: Test the function by using httprepl
- On the taskbar, select the Windows Terminal icon.
Run the following command to change the current directory to the Allfiles (F):\Allfiles\Labs\02\Starter\func directory:
Codecd F:\Allfiles\Labs\02\Starter\funcFrom the command prompt, run the following command to run the function app project:
Codefunc start --buildNote: You can review the documentation to [start the function app project locally][azure-functions-core-tools-start-function] using the Azure Functions Core Tools.
- On the taskbar, select the Windows Terminal icon again to open a new instance of the Windows Terminal application.
From the command prompt, run the following command to start the httprepl tool setting the base Uniform Resource Identifier (URI) to
http://localhost:7071:Codehttprepl http://localhost:7071Note: An error message is displayed by the httprepl tool. This message occurs because the tool is searching for a Swagger definition file to use to traverse the API. Because your function project doesn’t produce a Swagger definition file, you’ll need to traverse the API manually.
When you receive the tool prompt, run the following command to browse to the relative api endpoint:
Codecd apiRun the following command to browse to the relative getsettinginfo endpoint:
Codecd getsettinginfoRun the following command to run the get command for the current endpoint:
CodegetObserve the JSON content of the response from the function app, which should now include:
Code{ "version": "0.2.4", "root": "/usr/libexec/mews_principal/", "device": { "id": "21e46d2b2b926cba031a23c6919" }, "notifications": { "email": "joseph.price@contoso.com", "phone": "(425) 555-0162 x4151" } }Run the following command to exit the httprepl application:
Codeexit- Close all currently running instances of the Windows Terminal application.
Review
In this exercise, you created a function that returns the content of a JSON file in Storage.
Exercise 6: Deploy a local function project to an Azure Functions app
Task 1: Deploy using the Azure Functions Core Tools
- On the taskbar, select the Windows Terminal icon.
Run the following command to change the current directory to the Allfiles (F):\Allfiles\Labs\02\Starter\func directory:
Codecd F:\Allfiles\Labs\02\Starter\funcFrom command prompt, run the following command to login to the Azure Command-Line Interface (CLI):
Codeaz login- In the Microsoft Edge browser window, enter the name and password of the Microsoft or Azure Active Directory account you are using in this lab, and then select Sign in.
- Return to the currently open Windows Terminal window. Wait for the sign-in process to finish.
From the command prompt, run the following command to publish the function app project (replace the
<function-app-name>placeholder with the name of the function app you created earlier in this lab):Codefunc azure functionapp publish <function-app-name>Note: For example, if your Function App name is funclogicstudent, your command would be
func azure functionapp publish funclogicstudent. You can review the documentation to [publish the local function app project][azure-functions-core-tools-publish-azure] using the Azure Functions Core Tools.- Wait for the deployment to finalize before you move forward with the lab.
- Close the currently running Windows Terminal application.
Task 2: Validate deployment
- On the taskbar, select the Microsoft Edge icon, and select the tab that displays the Azure portal (https://portal.azure.com).
- On the Azure portal’s navigation pane, select the Resource groups link.
- On the Resource groups blade, select the Serverless resource group that you created previously in this lab.
- On the Serverless blade, select the funclogic[yourname] function app that you created previously in this lab.
- On the Function App blade, select the Functions option in the Functions section.
- On the Functions pane, select the existing GetSettingInfo function.
- In the Function blade, select the Code + Test option in the Developer section.
- In the function editor, select Test/Run.
- In the automatically displayed pane, in the HTTP method drop-down list, select GET.
- Select Run to test the function.
In the HTTP response content, review the results of the test run. The JSON content should now include the following code:
Code{ "version": "0.2.4", "root": "/usr/libexec/mews_principal/", "device": { "id": "21e46d2b2b926cba031a23c6919" }, "notifications": { "email": "joseph.price@contoso.com", "phone": "(425) 555-0162 x4151" } }
Review
In this exercise, you deployed a local function project to Azure Functions and validated that the functions work in Azure.
Exercise 7: Clean up your subscription
Task 1: Open Azure Cloud Shell and list resource groups
In the Azure portal, select the Cloud Shell icon
 to open a new Bash session. If Cloud Shell defaults to a PowerShell session, select PowerShell, and in the drop-down menu, select Bash.
Note: If this is the first time you’re starting Cloud Shell, when prompted to select either Bash or PowerShell, select PowerShell. When you’re presented with the You have no storage mounted message, select the subscription you’re using in this lab, and then select Create storage.
Task 2: Delete a resource group
On the Cloud Shell pane, run the following command to delete the Serverless resource group:
Codeaz group delete --name Serverless --no-wait --yesNote: The command executes asynchronously (as determined by the –no-wait parameter), so while you’ll be able to run another Azure CLI command immediately afterwards within the same Bash session, it’ll take a few minutes before the resource groups are removed.
Close the Cloud Shell pane in the portal.
Task 3: Close the active application
- Close the currently running Microsoft Edge application.

No comments:
Post a Comment