Microsoft Azure user interface
Given the dynamic nature of Microsoft cloud tools, you might experience Azure UI changes that occur after the development of this training content. As a result, the lab instructions and lab steps might not align correctly.
Microsoft updates this training course when the community alerts us to needed changes. However, cloud updates occur frequently, so you might encounter UI changes before this training content updates. If this occurs, adapt to the changes, and then work through them in the labs as needed.
Instructions
Before you start
Sign in to the lab environment
Sign in to your Windows 10 virtual machine (VM) by using the following credentials:
Username: Admin
Password: Pa55w.rd
Note: Your instructor will provide instructions to connect to the virtual lab environment.
Review the installed applications
Find the taskbar on your Windows 10 desktop. The taskbar contains the icons for the applications that you’ll use in this lab, including:
- Microsoft Edge
- File Explorer
- Windows Terminal
- Visual Studio Code
Lab overview
View this video by right-clicking this video link and select ‘Open link in a new tab / new window’.
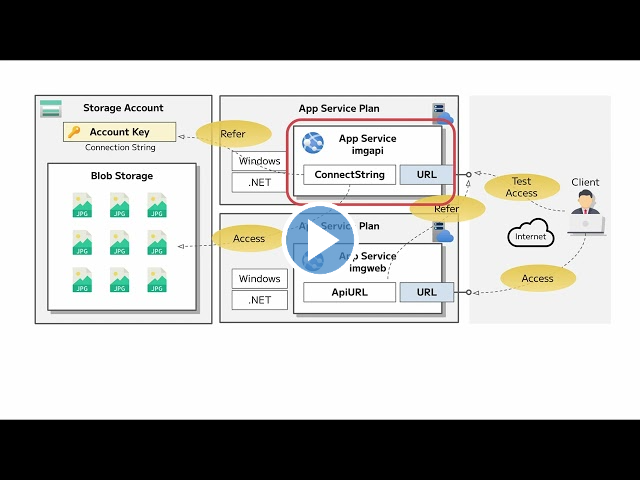
Architecture diagram
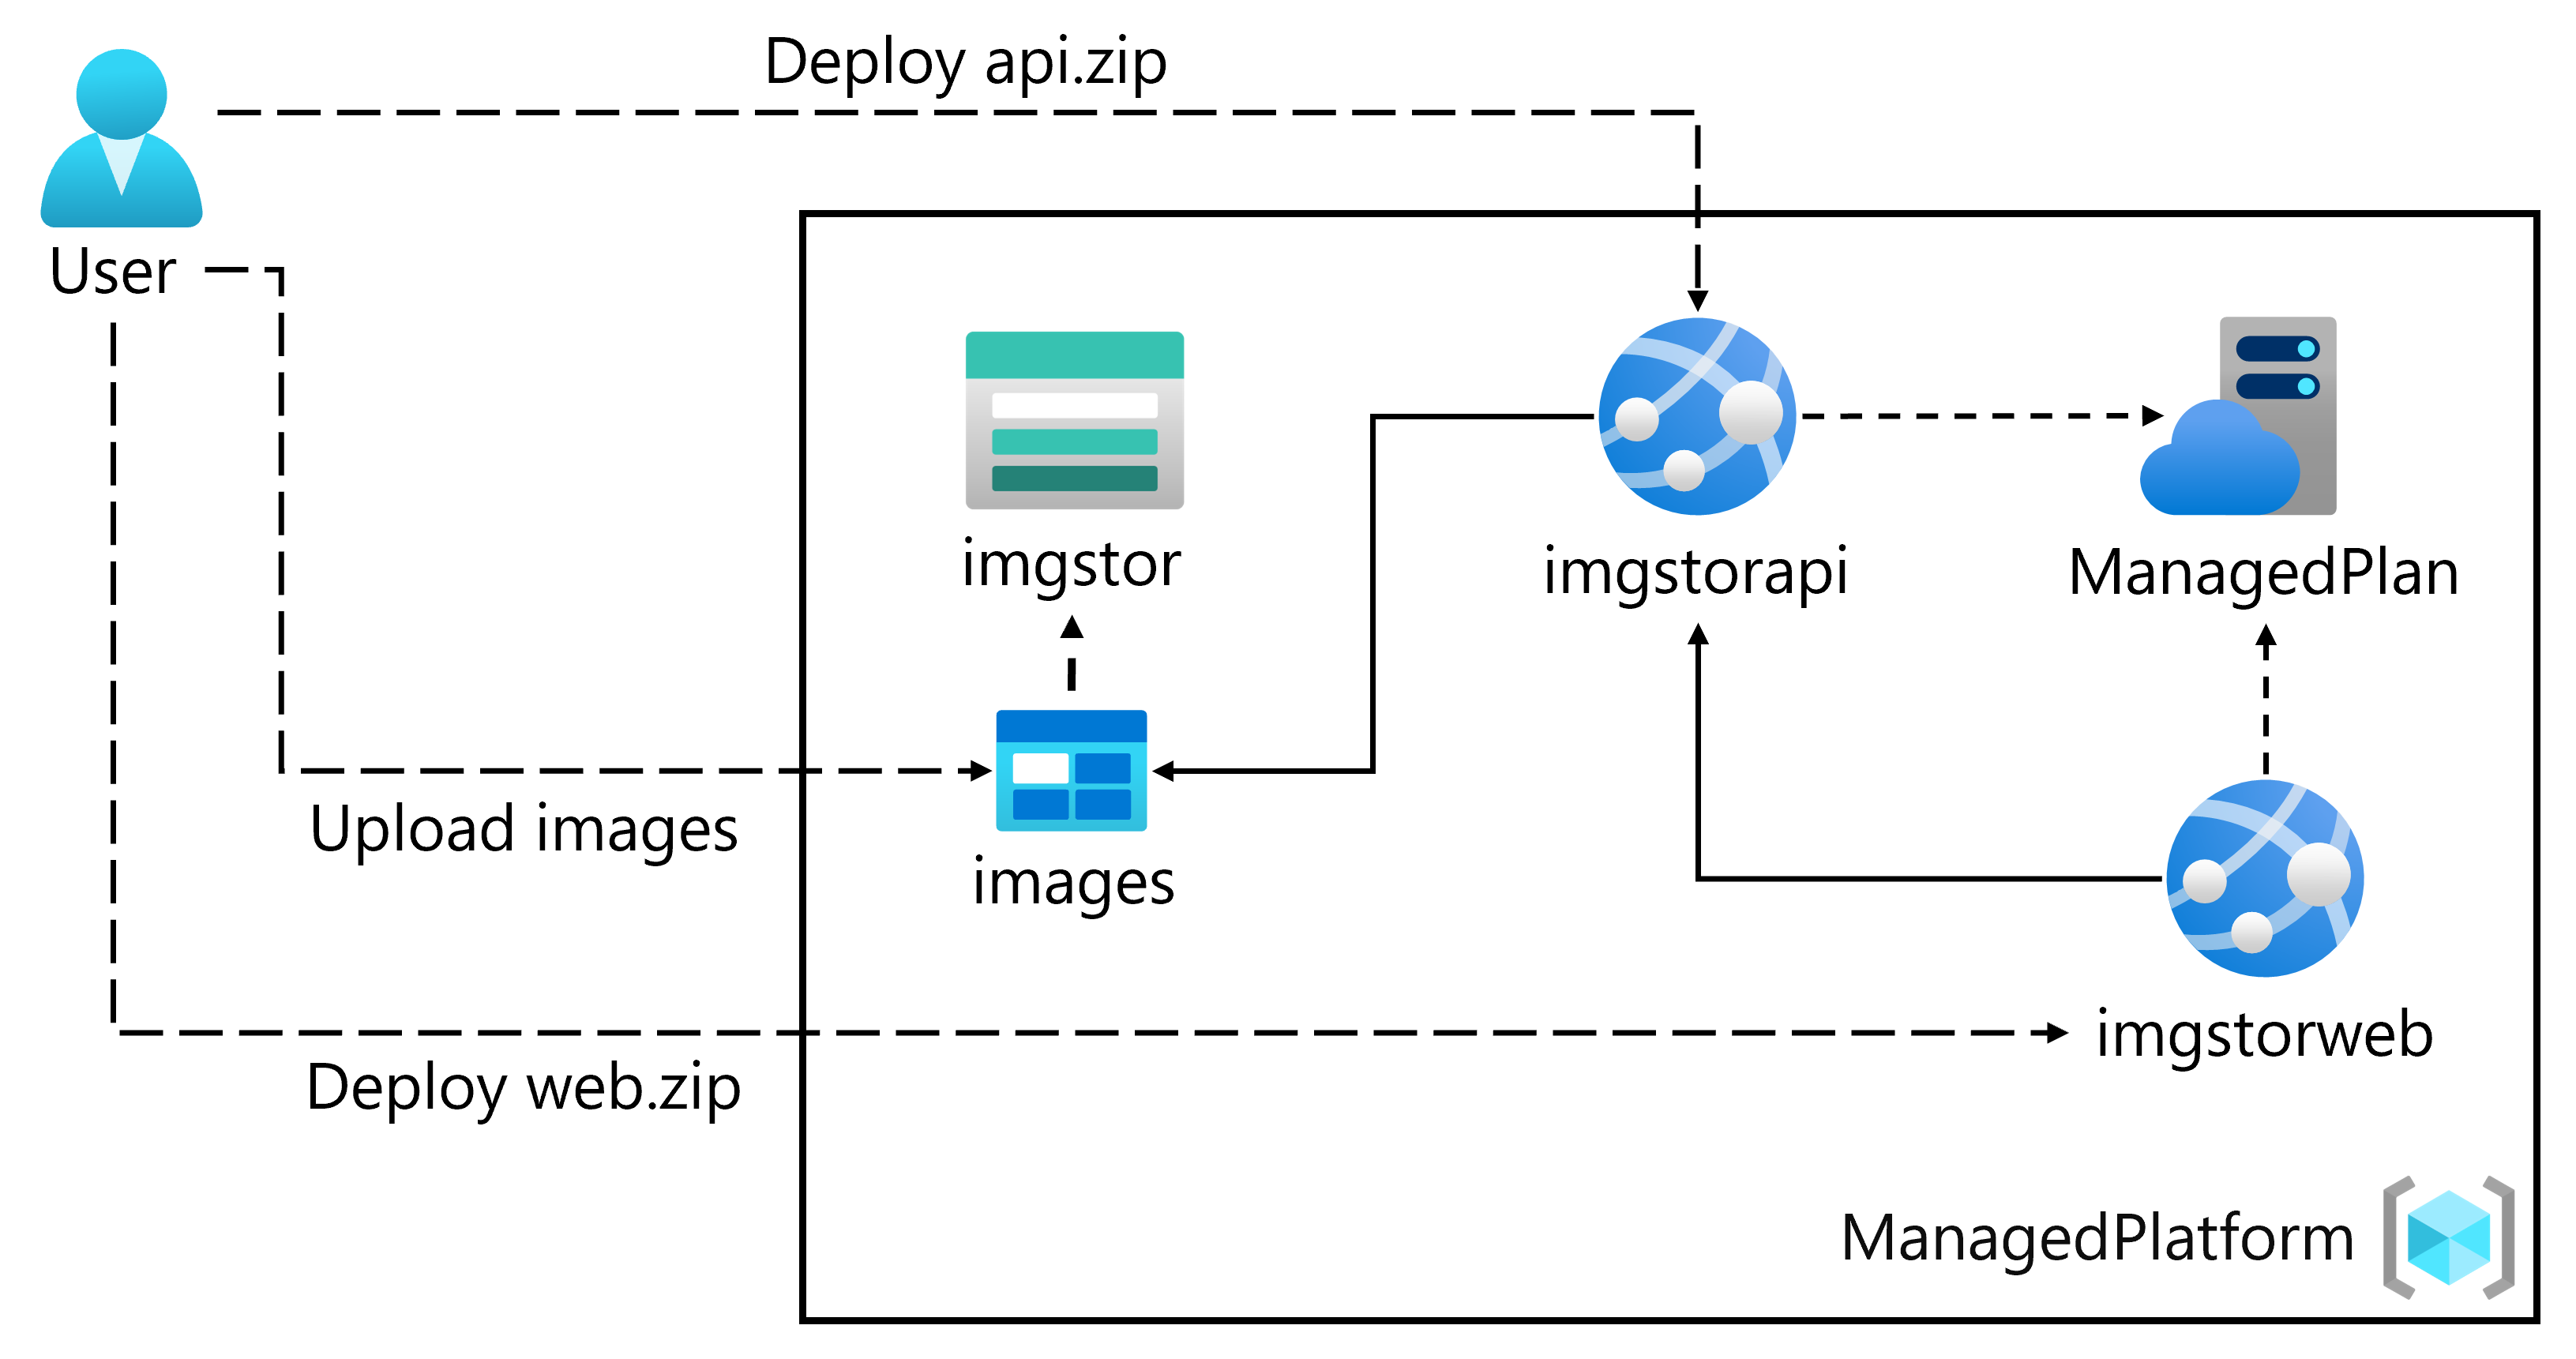
Exercise 1: Build a backend API by using Azure Storage and the Web Apps feature of Azure App Service
Task 1: Open the Azure portal
On the taskbar, select the Microsoft Edge icon.
In the browser window, browse to the Azure portal (https://portal.azure.com), and then sign in with the account you’ll be using for this lab.
Note: If this is your first time signing in to the Azure portal, you’ll be offered a tour of the portal. If you prefer to skip the tour, select Maybe later to begin using the portal.
Task 2: Create a Storage account
In the Azure portal, use the Search resources, services, and docs text box to search for Storage Accounts, and then in the list of results, select Storage Accounts.
On the Storage accounts blade, select + Create.
On the Create a storage account blade, on the Basics tab, perform the following actions, and then select Review:
Setting Action Subscription drop-down list Retain the default value Resource group section Select Create new, enter ManagedPlatform, and then select OK Storage account name text box Enter imgstor[yourname] Region drop-down list Select (US) East US Performance section Select the Standard option Redundancy drop-down list Select Locally-redundant storage (LRS) The following screenshot displays the configured settings on the Basics tab of the Create a storage account blade.

On the Review tab, review the options that you selected during the previous steps.
Select Create to create the storage account by using your specified configuration.
Note: Wait for the creation task to complete before you proceed with this lab.
On the Overview blade, select the Go to resource button to navigate to the blade of the newly created storage account.
On the Storage account blade, in the Security + networking section, select Access keys.
On the Access keys blade, select Show keys.
Review any one of the keys, and then copy the value of either of the Connection string boxes to the clipboard.
Note: It doesn’t matter which connection string you choose. They are interchangeable.
Open Notepad, and then paste the copied connection string value to Notepad. You’ll use this value later in this lab.
Task 3: Upload a sample blob
On the Storage Account blade, in the Data storage section, select the Containers link.
On the Containers blade, select + Container.
In the New container window, perform the following actions:
Setting Action Name text box Enter images Public access level list Select Blob (anonymous read access for blobs only), and then select Create On the Containers blade, select the newly created images container.
On the images blade, select Upload.
In the Upload blob window, perform the following actions:
Setting Action Files section Select the Folder icon File Explorer window Browse to Allfiles (F):\Allfiles\Labs\01\Starter\Images, select the grilledcheese.jpg file, and then select Open Overwrite if files already exist check box Ensure that the check box is selected, and then select Upload Note: Wait for the blob to upload before you continue with this lab.
Task 4: Create a web app
On the Azure portal’s navigation pane, select Create a resource.
On the Create a resource blade, in the Search services and marketplace text box, enter Web App, and then select Enter.
On the Marketplace search results blade, select the Web App result.
On the Web App blade, select Create.
On the Create Web App blade, on the Basics tab, perform the following actions, and then select the Monitoring tab:
Setting Action Subscription drop-down list Retain the default value Resource group section Select ManagedPlatform Name text box Enter imgapi[yourname] Publish section Select Code Runtime stack drop-down list Select .NET 6 (LTS) Operating System section Select Windows Region drop-down list Select the East US region Windows Plan (East US) section Select Create new, enter the value ManagedPlan in the Name text box, and then select OK SKU and size section Retain the default value The following screenshot displays the configured settings on the Create web app blade.

On the Monitoring tab, in the Enable Application Insights section, select No, and then select Review + create.
On the Review + create tab, review the options that you selected during the previous steps.
Select Create to create the web app by using your specified configuration.
Note: Wait for the web app to be created before you continue with this lab.
On the Overview blade, select the Go to resource button to navigate to the blade of the newly created web app.
Task 5: Configure the web app
On the App Service blade, in the Settings section, select the Configuration link.
In the Configuration section, perform the following actions, select Save, and then select Continue.
Setting Action Application settings tab Select New application setting Add/Edit application setting pop-up dialog In the Name text box, enter StorageConnectionString Value text box Paste the storage connection string that you previously copied to Notepad Deployment slot setting text box Retain the default value, and then select OK to close the pop-up dialog and return to the Configuration section Wait for your application settings to save before you continue with the lab.
On the App Service blade in the Settings section, select the Properties link.
In the Properties section, copy the value of the URL hyperlink, and then paste it to Notepad. You’ll use this value later in the lab.
Note: At this point, the web server at this URL will return a placeholder webpage. You haven’t deployed any code to the Web App yet. You’ll deploy code to the Web App later in this lab.
Task 6: Deploy an ASP.NET web application to Web Apps
On the taskbar, select the Visual Studio Code icon.
On the File menu, select Open Folder.
In the File Explorer window, browse to Allfiles (F):\Allfiles\Labs\01\Starter\API, and then select Select Folder.
Note: Ignore any prompts to add required assets to build and debug and to run the restore command to address unresolved dependencies.
On the Explorer pane of the Visual Studio Code window, expand the Controllers folder, and then select the ImagesController.cs file to open the file in the editor.
In the editor, in the ImagesController class on line 26, observe the GetCloudBlobContainer method and the code used to retrieve a container.
In the ImagesController class on line 36, observe the Get method and the code used to retrieve all blobs asynchronously from the images container.
In the ImagesController class on line 55, observe the Post method and the code used to persist an uploaded image to Storage.
On the taskbar, select the Windows Terminal icon.
At the open command prompt, enter the following command, and then select Enter to sign in to the Azure Command-Line Interface (CLI):
Codeaz loginIn the Microsoft Edge browser window, enter the email address and password for your Microsoft account, and then select Sign in.
Return to the currently open Windows terminal Command Prompt window. Wait for the sign-in process to finish.
At the command prompt, enter the following command, and then select Enter to list all the apps in your ManagedPlatform resource group:
Codeaz webapp list --resource-group ManagedPlatformEnter the following command, and then select Enter to find the apps that have the imgapi* prefix:
Codeaz webapp list --resource-group ManagedPlatform --query "[?starts_with(name, 'imgapi')]"Enter the following command, and then select Enter to render only the name of the single app that has the imgapi* prefix:
Codeaz webapp list --resource-group ManagedPlatform --query "[?starts_with(name, 'imgapi')].{Name:name}" --output tsvEnter the following command, and then select Enter to change the current directory to the Allfiles (F):\Allfiles\Labs\01\Starter\API directory that contains the lab files:
Codecd F:\Allfiles\Labs\01\Starter\API\Enter the following command, and then select Enter to deploy the api.zip file to the web app that you created previously in this lab:
Codeaz webapp deployment source config-zip --resource-group ManagedPlatform --src api.zip --name <name-of-your-api-app>Note: Replace the <name-of-your-api-app> placeholder with the name of the web app that you created previously in this lab. You recently queried this app’s name in the previous steps.
Wait for the deployment to complete before you continue with this lab.
On the Azure portal’s navigation pane, select the Resource groups link.
On the Resource groups blade, select the ManagedPlatform resource group that you created previously in this lab.
On the ManagedPlatform blade, select the imgapi[yourname] web app that you created previously in this lab.
From the App Service blade, select Browse.
Note: The Browse command will perform a GET request to the root of the website, which returns a JavaScript Object Notation (JSON) array. This array should contain the URL for your single uploaded image in your Storage account.
Return to your browser window that contains the Azure portal.
Close the currently running Visual Studio Code and Windows Terminal applications.
Review
In this exercise, you created a web app in Azure, and then deployed your ASP.NET web application to Web Apps by using the Azure CLI and Apache Kudu zip file deployment utility.
Exercise 2: Build a front-end web application by using Azure Web Apps
Task 1: Create a web app
On the Azure portal’s navigation pane, select Create a resource.
On the Create a resource blade, in the Search services and marketplace text box, enter Web App, and then select Enter.
On the Marketplace search results blade, select Web App.
On the Web App blade, select Create.
On the Create Web App blade, on the Basics tab, perform the following actions, and then select the Monitoring tab:
Setting Action Subscription drop-down list Retain the default value Resource group section Select ManagedPlatform Name text box Enter imgweb[yourname] Publish section Select Code Runtime stack drop-down list Select .NET 6 (LTS) Operating System section Select Windows Region drop-down list Select the East US region Windows Plan (East US) section Select ManagedPlan (S1)
The following screenshot displays the configured settings on the Create web app blade.

On the Monitoring tab, in the Enable Application Insights section, select No, and then select Review + create.
From the Review + create tab, review the options that you selected during the previous steps.
Select Create to create the web app by using your specified configuration.
Note: Wait for the creation task to complete before you continue with this lab.
On the Overview blade, select the Go to resource button to navigate to the blade of the newly created web app.
Task 2: Configure a web app
On the App Service blade, in the Settings section, select the Configuration link.
In the Configuration section, perform the following actions, select Save, and then select Continue:
Setting Action Application settings tab Select New application setting Add/Edit application setting pop-up dialog In the Name text box, enter ApiUrl Value text box Enter the web app URL that you copied previously in this lab. Note: Make sure you include the protocol https://, in the URL that you copy into the Value text box for this application setting Deployment slot setting text box Retain the default value, and then select OK Note: Wait for the application settings to save before you continue with this lab.
Task 3: Deploy an ASP.NET web application to Web Apps
On the taskbar, select the Visual Studio Code icon.
On the File menu, select Open Folder.
In the File Explorer window, browse to Allfiles (F):\Allfiles\Labs\01\Starter\Web, and then select Select Folder.
Note: Ignore any prompts to add required assets to build and debug and to run the restore command to address unresolved dependencies.
On the Explorer pane of the Visual Studio Code window, expand the Pages folder, and then select the Index.cshtml.cs file to open the file in the editor.
In the editor, in the IndexModel class on line 30, observe the OnGetAsync method and the code used to retrieve the list of images from the API.
In the IndexModel class on line 41, observe the OnPostAsync method and the code used to stream an uploaded image to the backend API.
On the taskbar, select the Windows Terminal icon.
At the open command prompt, enter the following command, and then select Enter to sign in to the Azure CLI:
Codeaz loginIn the Microsoft Edge browser window, enter the email address and password for your Microsoft account, and then select Sign in.
Return to the currently open Windows Terminal Command Prompt window. Wait for the sign-in process to finish.
Enter the following command, and then select Enter to list all the apps in your ManagedPlatform resource group:
Codeaz webapp list --resource-group ManagedPlatformEnter the following command, and then select Enter to find the apps that have the imgweb* prefix:
Codeaz webapp list --resource-group ManagedPlatform --query "[?starts_with(name, 'imgweb')]"Enter the following command, and then select Enter to render only the name of the single app that has the imgweb* prefix:
Codeaz webapp list --resource-group ManagedPlatform --query "[?starts_with(name, 'imgweb')].{Name:name}" --output tsvEnter the following command, and then select Enter to change the current directory to the Allfiles (F):\Allfiles\Labs\01\Starter\Web directory that contains the lab files:
Codecd F:\Allfiles\Labs\01\Starter\Web\Enter the following command, and then select Enter to deploy the web.zip file to the web app that you created previously in this lab:
Codeaz webapp deployment source config-zip --resource-group ManagedPlatform --src web.zip --name <name-of-your-web-app>Note: Replace the <name-of-your-web-app> placeholder with the name of the web app that you created previously in this lab. You recently queried this app’s name in the previous steps.
Wait for the deployment to complete before you continue with this lab.
On the Azure portal’s navigation pane, select Resource groups.
On the Resource groups blade, select the ManagedPlatform resource group that you created previously in this lab.
On the ManagedPlatform blade, select the imgweb[yourname] web app that you created previously in this lab.
On the App Service blade, select Browse.
Observe the list of images in the gallery. The gallery should list a single image that was uploaded to Storage previously in the lab.
In the Contoso Photo Gallery webpage, in the Upload a new image section, perform the following actions:
a. Select Browse.
b. In the File Explorer window, browse to Allfiles (F):\Allfiles\Labs\01\Starter\Images, select the bahnmi.jpg file, and then select Open.
c. Select Upload.
Observe that the list of gallery images has updated with your new image.
Note: In some rare cases, you might need to refresh your browser window to retrieve the new image.
Return to the browser window that contains the Azure portal.
Close the currently running Visual Studio Code and Windows Terminal applications.
Review
In this exercise, you created an Azure web app and deployed an existing web application’s code to the resource in the cloud.
Exercise 3: Clean up your subscription
Task 1: Open Azure Cloud Shell
In the Azure portal, select the Cloud Shell icon
 to open a new Bash session. If Cloud Shell defaults to a PowerShell session, select PowerShell, and in the drop-down menu, select Bash.
Note: If this is the first time you’re starting Cloud Shell, when prompted to select either Bash or PowerShell, select PowerShell. When you’re presented with the You have no storage mounted message, select the subscription you’re using in this lab, and then select Create storage.
Task 2: Delete resource groups
On the Cloud Shell pane, run the following command to delete the ManagedPlatform resource group:
Codeaz group delete --name ManagedPlatform --no-wait --yesNote: The command executes asynchronously (as determined by the –no-wait parameter). While you’ll be able to run another Azure CLI command immediately after the command executes, within the same Bash session, it’ll take a few minutes before the resource groups are actually removed.
Close the Cloud Shell pane in the portal.
Task 3: Close the active applications
- Close the currently running Microsoft Edge application.


No comments:
Post a Comment